Setup Development Environment
Welcome to the Sui Move introduction course. In this first unit, we will walk you through the process of setting up the development environment for working with Sui Move, and create a basic Hello World project as a gentle introduction into the world of Sui.
Install Sui Binaries Locally
-
Install Sui binaries
cargo install --locked --git https://github.com/MystenLabs/sui.git --branch devnet suiChange the branch target here to
testnetormainnetif you are targeting one of those.Linux Users: The installation process will create build artifacts in /tmp directory. If you encountered
disk out of spacerelated issues during installation. Make sure to expand your tmpfs to at least 11GB.To check your tmpfs usage on Linux systems: df /tmp You can expand the tmpfs by editing the `/etc/fstab` file and setting the size of tmpfs to 20G: tmpfs /tmp tmpfs noatime,size=20G,mode=1777 0 0 -
Check binaries are installed successfully:
sui --versionYou should see the version number in the terminal if sui binaries were installed successfully.
Using a Docker Image with Pre-installed Sui Binaries
-
Pull Sui official docker image
docker pull mysten/sui-tools:devnet -
Start and shell into the Docker container:
docker run --name suidevcontainer -itd mysten/sui-tools:devnetdocker exec -it suidevcontainer bash
💡Note: If the above Docker image is not compatible with your CPU architecture, you can start with a base Rust Docker image appropriate for your CPU architecture, and install the Sui binaries and prerequisites as described above.
(Optional) Configure VS Code with Move Analyzer Plug-in
-
Install Move Analyzer plugin from VS Marketplace
-
Add compatibility for Sui style wallet addresses:
cargo install --git https://github.com/move-language/move move-analyzer --features "address20"
Sui CLI Basic Usage
Initialization
- Enter
Yfordo you want to connect to a Sui Full node server?and pressEnterto default to Sui Devnet full node - Enter
0for key scheme selection to chooseed25519
Managing Networks
- Switching network:
sui client switch --env [network alias] - Default network aliases:
- localnet: http://0.0.0.0:9000
- devnet: https://fullnode.devnet.sui.io:443
- List all current network aliases:
sui client envs - Add new network alias:
sui client new-env --alias <ALIAS> --rpc <RPC>- Try adding a testnet alias with:
sui client new-env --alias testnet --rpc https://fullnode.testnet.sui.io:443
- Try adding a testnet alias with:
Check Active Address and Gas Objects
- Check current addresses in key store:
sui client addresses - Check active-address:
sui client active-address - List all controlled gas objects:
sui client gas
Get Devnet or Testnet Sui Tokens
- Join Sui Discord
- Complete verification steps
- Enter
#devnet-faucetchannel for devnet tokens, or#testnet-faucetchannel for testnet tokens - Type
!faucet <WALLET ADDRESS>
Sui Project Structure
Sui Module and Package
-
A Sui module is a set of functions and types packed together which the developer publishes under a specific address
-
The Sui standard library is published under the
0x2address, while user-deployed modules are published under a pseudorandom address assigned by the Sui Move VM -
Module starts with the
modulekeyword, which is followed by the module name and curly braces - inside them, module contents are placed:#![allow(unused)] fn main() { module hello_world::hello_world { // module contents } } -
Published modules are immutable objects in Sui; an immutable object is an object that can never be mutated, transferred, or deleted. Because of this immutability, the object is not owned by anyone, and hence it can be used by anyone
-
A Move package is just a collection of modules with a manifest file called Move.toml
Initializing a Sui Move Package
Use the following Sui CLI command to start a skeleton Sui package:
sui move new <PACKAGE NAME>
For our example in this unit, we will start a Hello World project:
sui move new hello_world
This creates:
- the project root folder
hello_world - the
Move.tomlmanifest file - the
sourcessubfolder, which will contain Sui Move smart contract source files
Move.toml Manifest Structure
Move.toml is the manifest file of a package and is automatically generated in the project root folder.
Move.toml consists of three sections:
[package]Defines the name and version number of the package[dependencies]Defines other packages that this package depends on, such as the Sui standard library; other third-party dependencies should be added here as well[addresses]Defines aliases for addresses in the package source code
Sample Move.toml File
This is the Move.toml generated by the Sui CLI with the package name hello_world:
#![allow(unused)] fn main() { [package] name = "hello_world" version = "0.0.1" edition = "2024.beta" [dependencies] Sui = { git = "https://github.com/MystenLabs/sui.git", subdir = "crates/sui-framework/packages/sui-framework", rev = "framework/testnet" } [addresses] hello_world = "0x0" }
We see that the Sui standard library dependency here is defined using a GitHub repo, but it can also point to a local binary using its relative or absolute file path, for example:
#![allow(unused)] fn main() { [dependencies] Sui = { local = "../sui/crates/sui-framework/packages/sui-framework" } }
Sui Module and Package Naming
-
Sui Move module and package naming convention use snake casing, i.e. this_is_snake_casing.
-
A Sui module name uses the Rust path separator
::to divide the package name and the module name, examples:unit_one::hello_world-hello_worldmodule inunit_onepackagecapy::capy-capymodule incapypackage
-
For more information on Move naming conventions, please check the style section of the Move book.
Custom Types and Abilities
In this section, we will start creating our Hello World example contract step by step and explain fundamental concepts in Sui Move as they come up, such as custom types and abilities.
Initializing the Package
(If you skipped the previous section) You can initialize a Hello World Sui package with the following command in the command line after installing Sui binaries:
sui move new hello_world
Create the Contract Source File
Use an editor of your choice to create a Move smart contract source file called hello.move under the sources subfolder.
And create the empty module as follows:
#![allow(unused)]
fn main() {
module hello_world::hello_world {
    // module contents
}
}
Import Statements
You can directly import modules in Move by their address, but to make code easier to read, we can organize imports with the keyword use.
#![allow(unused)]
fn main() {
use <Address/Alias>::<ModuleName>;
}
In our example, we need to import the following modules:
#![allow(unused)]
fn main() {
use std::string;
use sui::object::{Self, UID};
use sui::transfer;
use sui::tx_context::{Self, TxContext};
}
Custom Types
A structure in Sui Move is a custom type that contains key-value pairs, where the key is the name of a property, and the value is what's stored. Defined using the keyword struct, a structure can have up to 4 abilities.
Abilities
Abilities are keywords in Sui Move that define how types behave at the compiler level.
Abilities are crucial to defining how objects behave in Sui Move at the language level. Each unique combination of abilities in Sui Move is its own design pattern. We will study abilities and how to use them in Sui Move throughout the course.
For now, just know that there are four abilities in Sui Move:
- copy: value can be copied (or cloned by value)
- drop: value can be dropped by the end of the scope
- key: value can be used as a key for global storage operations
- store: value can be stored inside global storage
Assets
Custom types that have the abilities key and store are considered to be assets in Sui Move. Assets are stored in global storage and can be transferred between accounts.
Hello World Custom Type
We define the object in our Hello World example as the following:
#![allow(unused)]
fn main() {
/// An object that contains an arbitrary string
public struct HelloWorldObject has key, store {
  	id: UID,
  	/// A string contained in the object
  	text: string::String
}
}
UID here is a Sui Framework type (sui::object::UID) that defines the globally unique ID of an object. Any custom type with the key ability is required to have an ID field.
Functions
In this section, we will introduce functions in Sui Move and write our first Sui Move function as a part of the Hello World example.
Function Visibility
Sui Move functions have three types of visibility:
- private: the default visibility of a function; it can only be accessed by functions inside the same module
- public: the function is accessible by functions inside the same module and by functions defined in another module
- public(package): the function is accessible by functions inside the same module
Return Value
The return type of a function is specified in the function signature after the function parameters, separated by a colon.
A function's last line (of execution) without a semicolon is the return value.
Example:
#![allow(unused)]
fn main() {
    public fun addition (a: u8, b: u8): u8 {
        a + b
    }
}
Transaction Context
Functions called directly through a transaction typically have an instance of TxContext as the last parameter. This is a special parameter set by the Sui Move VM and does not need to be specified by the user calling the function.
The TxContext object contains essential information about the transaction used to call the entry function, such as the sender's address, the signer's address, the tx's epoch, etc.
Create the mint Function
We can define our minting function in the Hello World example as the following:
#![allow(unused)]
fn main() {
    public fun mint(ctx: &mut TxContext) {
        let object = HelloWorldObject {
            id: object::new(ctx),
            text: string::utf8(b"Hello World!")
        };
        transfer::public_transfer(object, tx_context::sender(ctx));
    }
}
This function simply creates a new instance of the HelloWorldObject custom type, then uses the Sui system public_transfer function to send it to the transaction caller.
Contract Deployment and Hello World Demo
The Complete Hello World Sample Project
You can find the complete Hello World project in this directory.
Deploying the Contract
We will use the Sui CLI to deploy the package to the Sui network. You can deploy it to either the Sui devnet, testnet, or the local node. Just set the Sui CLI to the respective network and have enough tokens to pay for gas.
The Sui CLI command for deploying the package is the following:
sui client publish --gas-budget <gas_budget> [absolute file path to the package that needs to be published]
For the gas_budget, we can use a standard value like 20000000.
If the absolute file path to the package is not provided, it will default to . or the current directory.
The output should look something like this if the contract was successfully deployed:

The object ID under the Published Objects section is the object ID of the Hello World package we just published.
Let's export that to a variable.
export PACKAGE_ID=<package object ID from previous output>
Calling a Method through a Transaction
Next, we want to mint a Hello World object by calling the mint function in the smart contract we just deployed.
Note that we are able to do this because mint is an entry function.
The command for this using Sui CLI is:
sui client call --function mint --module hello_world --package $PACKAGE_ID --gas-budget 10000000
The console output should look like this if the mint function was successfully called and a Hello World object was created and transferred:
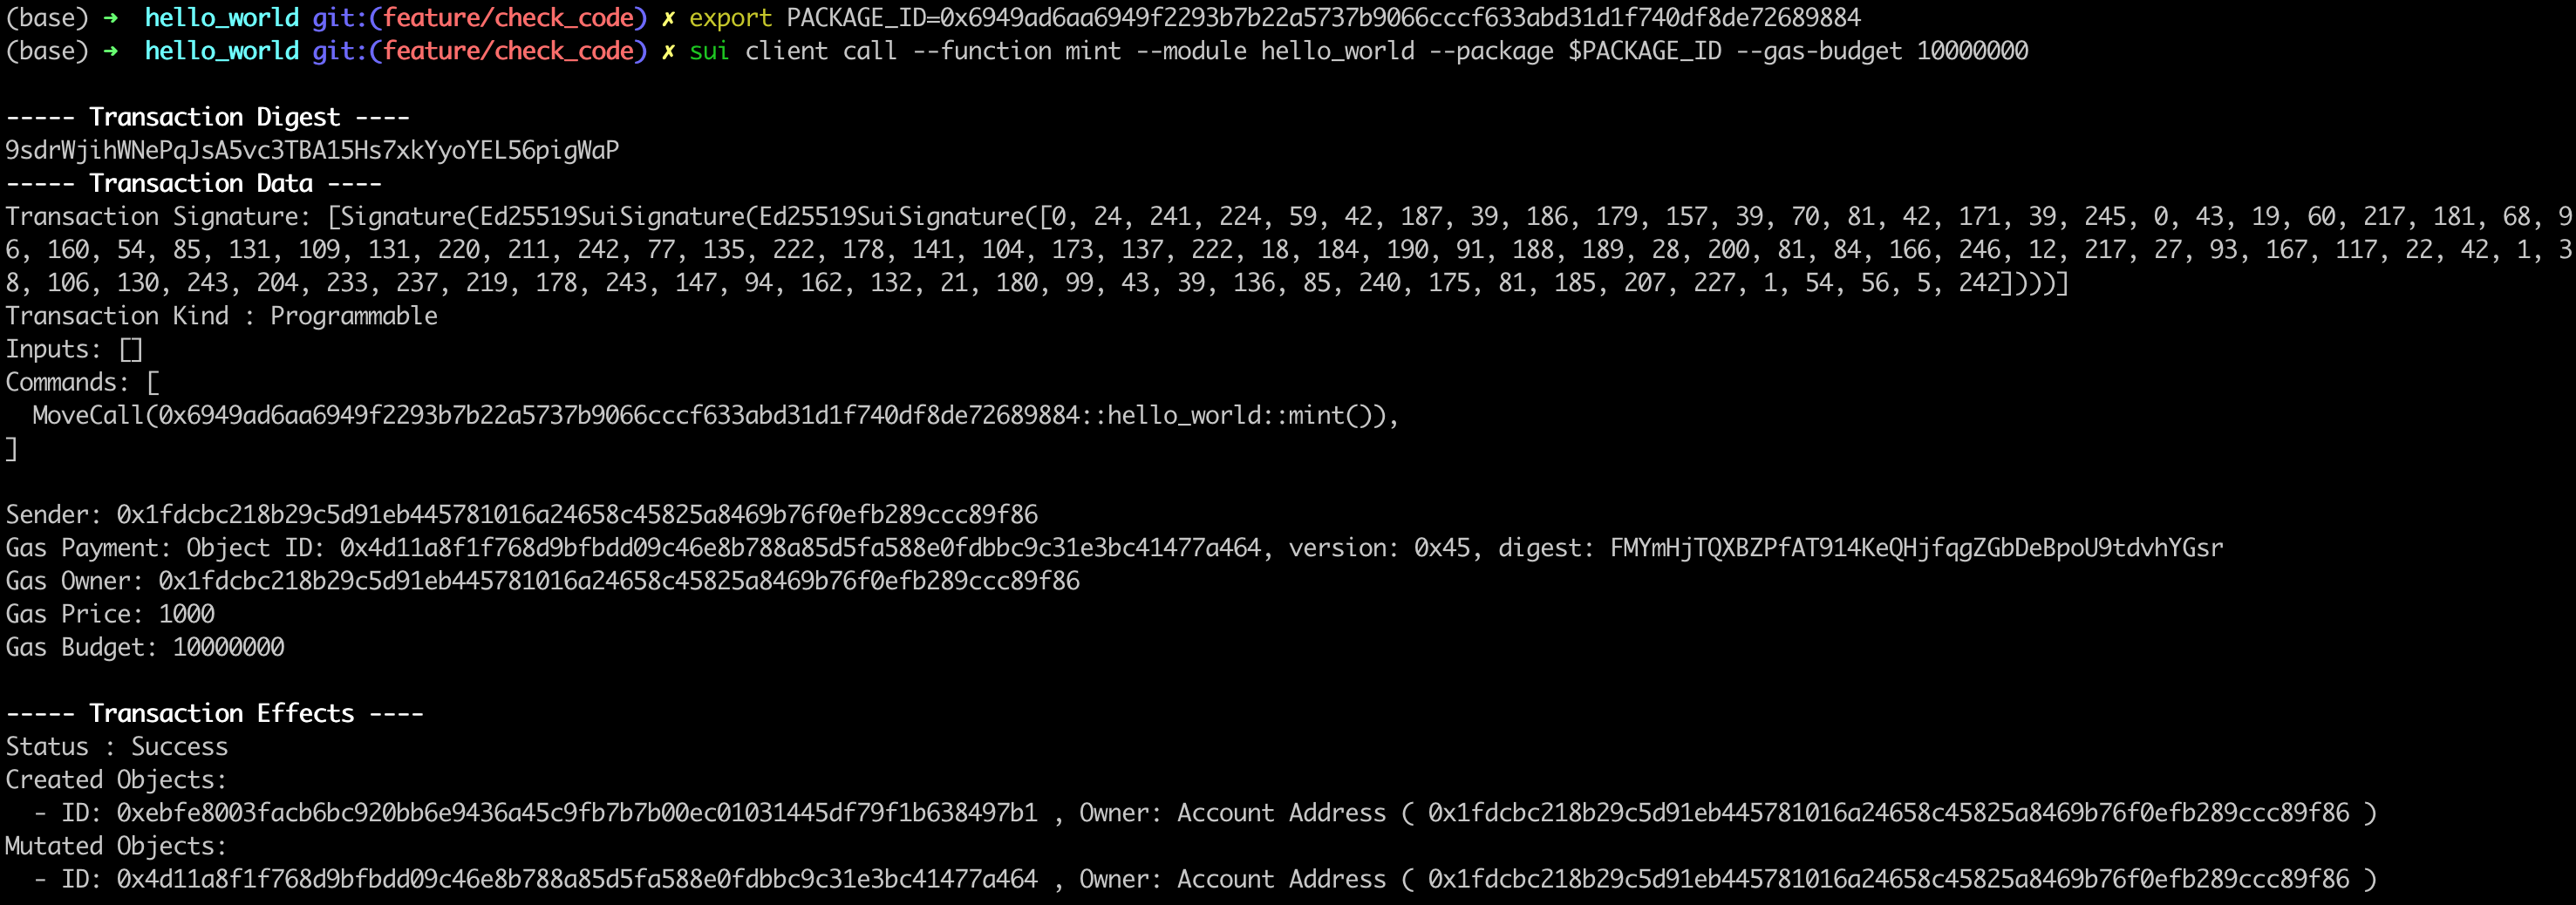
The object ID under the Created Objects section of the output is the ID of the Hello World object.
Viewing the Object with Sui Explorer
Let's use the Sui Explorer to view the Hello World object we just created and transferred.
Choose the network you are using through the dropdown menu on the upper right.
If you are using a local dev node, select the Custom RPC URL option and enter:
http://127.0.0.1:9000
Search for the object ID from the output of the previous transaction and you should be able to find the object on the explorer:
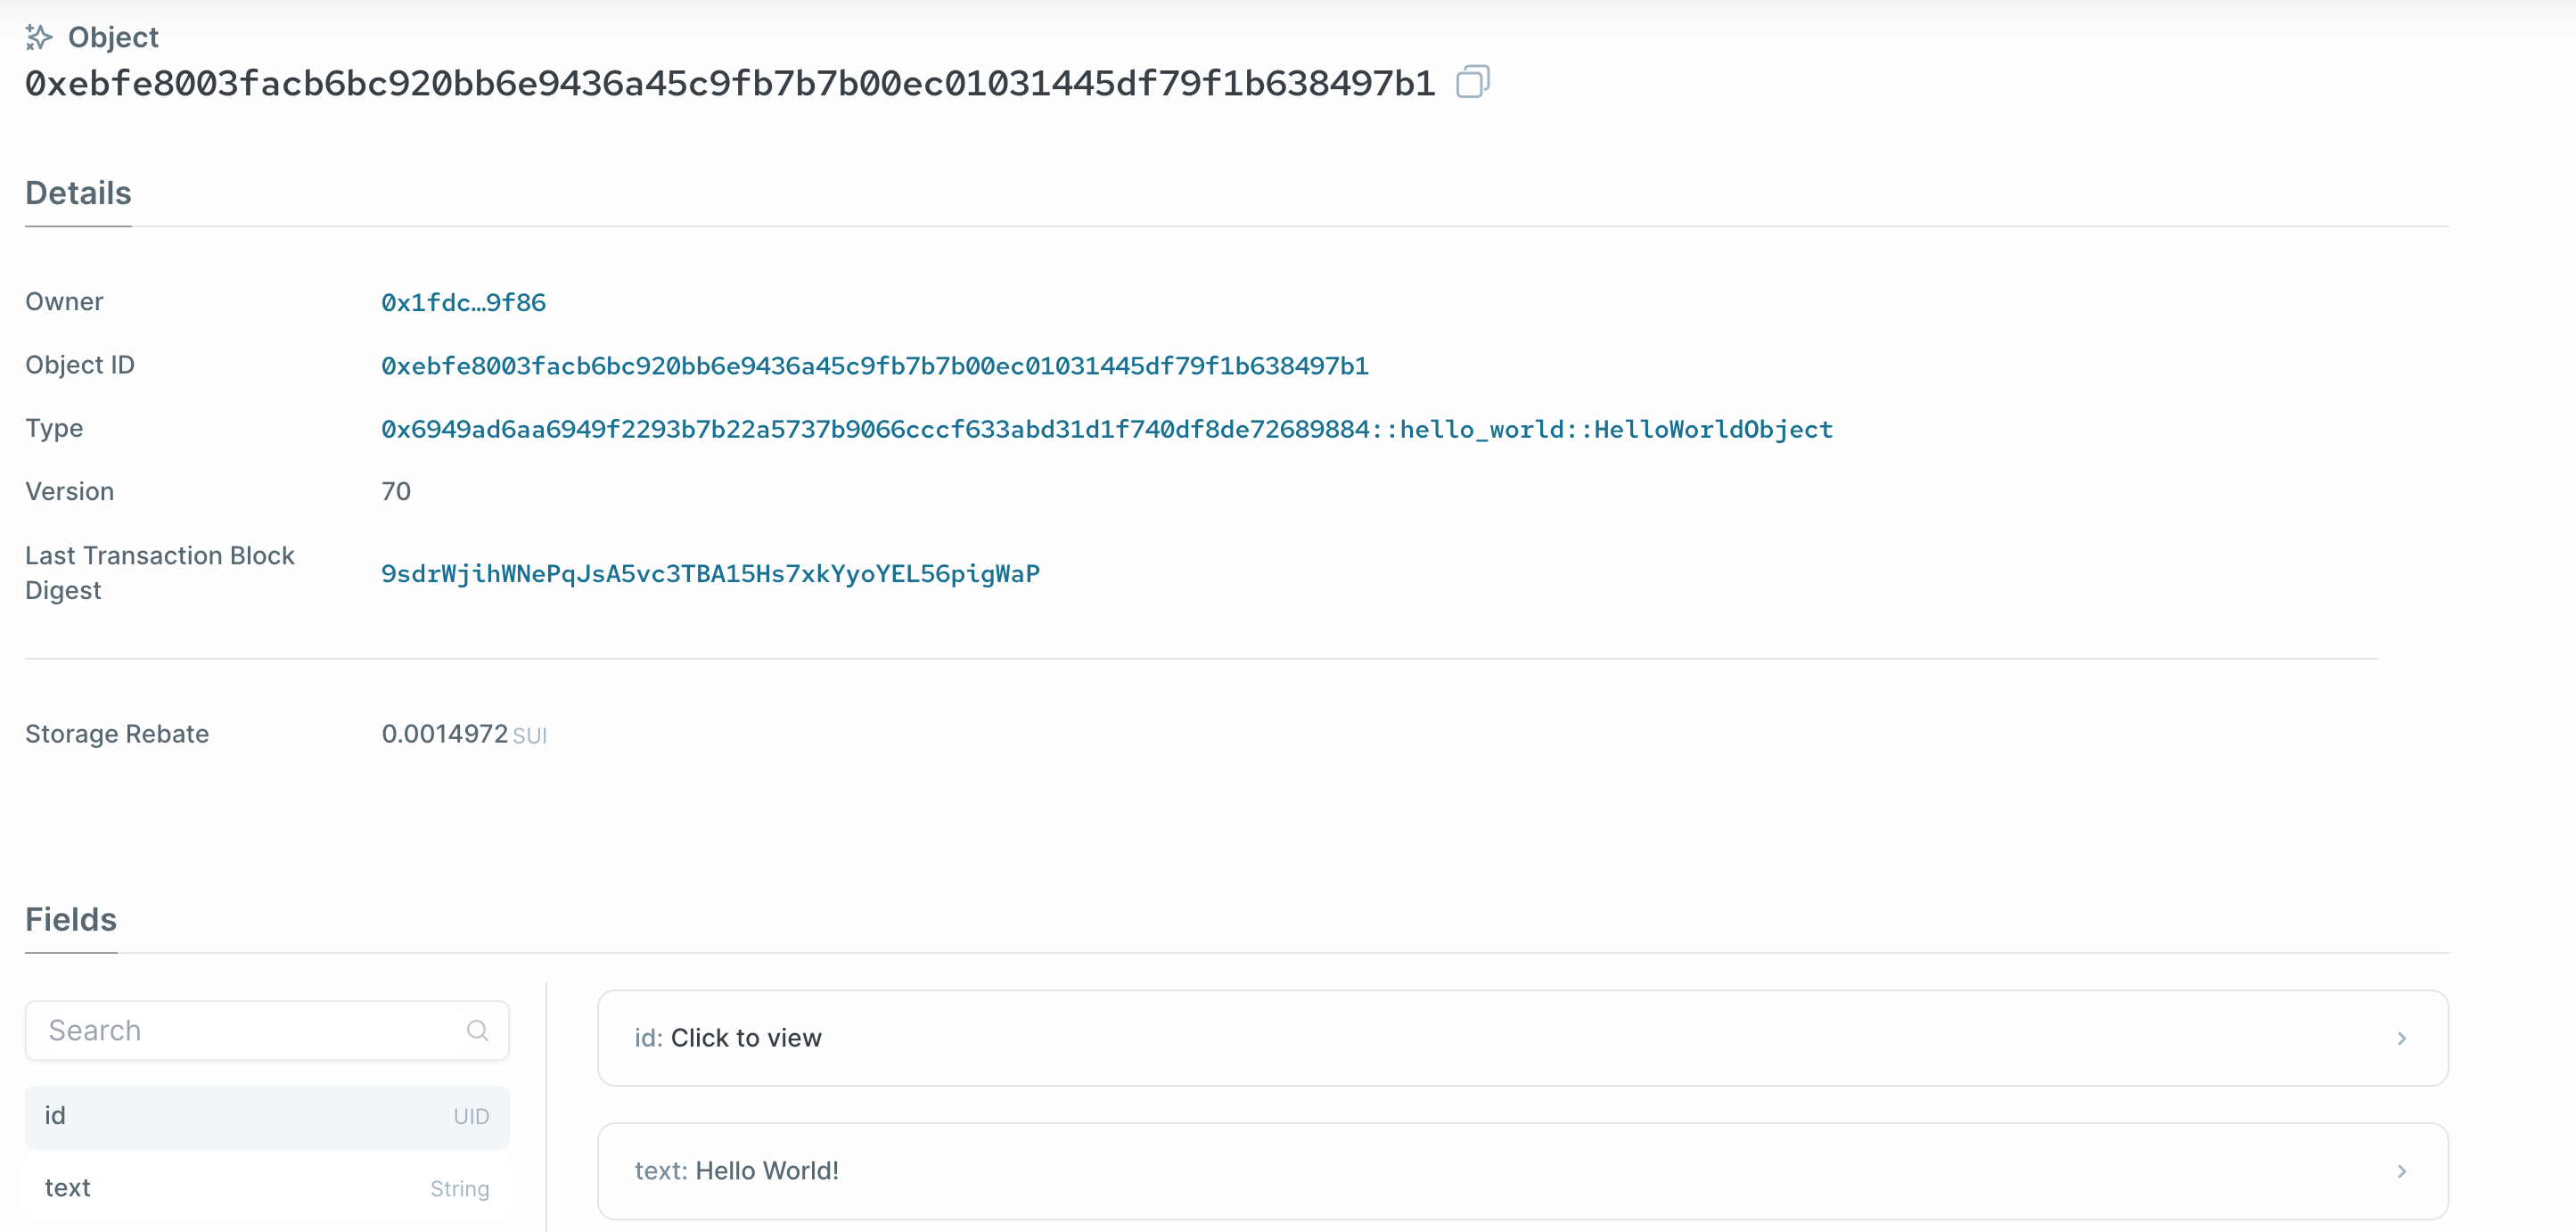
You should see the text "Hello World!" under the object's properties.
Great job, this concludes the first unit of the course.
Introduction
Types of Ownership of Sui Objects
Each object in Sui has an owner field that indicates how this object is being owned. In Sui Move, there are a total of four types of ownership.
- Owned
- Owned by an address
- Owned by another object
- Shared
- Shared immutable
- Shared mutable
Owned Objects
The first two types of ownership fall under the Owned Objects category. Owned objects in Sui are processed differently from shared objects and do not require global ordering.
Owned by an Address
Let's continue using our transcript example here. This type of ownership is pretty straightforward as the object is owned by an address to which the object is transferred upon object creation, such as in the above example at this line:
#![allow(unused)]
fn main() {
    transfer::transfer(transcriptObject, tx_context::sender(ctx)) // where tx_context::sender(ctx) is the recipient
}
where the transcriptObject is transferred to the address of the transaction sender upon creation.
Owned by An Object
In order for an object to be owned by another object, it is done using dynamic_object_field, which we will explore in a future section. Basically, when an object is owned by another object, we will call it a child object. A child object is able to be looked up in global storage using its object ID.
Shared Objects
Shared Immutable Objects
Certain objects in Sui cannot be mutated by anyone, and because of this, these objects do not have an exclusive owner. All published packages and modules in Sui are immutable objects.
To make an object immutable manually, one can call the following special function:
#![allow(unused)]
fn main() {
    transfer::freeze_object(obj);
}
Shared Mutable Objects
Shared objects in Sui can be read or mutated by anyone. Shared object transactions require global ordering through a consensus layer protocol, unliked owned objects.
To create a shared object, one can call this method:
#![allow(unused)]
fn main() {
    transfer::share_object(obj);
}
Once an object is shared, it stays mutable and can be accessed by anyone to send a transaction to mutate the object.
Parameter Passing and Object Deletion
Parameter Passing (by value, ref and mut ref)
If you are familiar with rustlang, then you are probably familiar with the Rust ownership system. One advantage of movelang compared to Solidity is that you can get a sense of what a function call might do to the asset that you used for the function interaction. Here are some examples:
#![allow(unused)]
fn main() {
use sui::object::{Self};

// You are allowed to retrieve the score but cannot modify it
public fun view_score(transcriptObject: &TranscriptObject): u8{
    transcriptObject.literature
}

// You are allowed to view and edit the score but not allowed to delete it
public fun update_score(transcriptObject: &mut TranscriptObject, score: u8){
    transcriptObject.literature = score
}

// You are allowed to do anything with the score, including view, edit, or delete the entire transcript itself.
public fun delete_transcript(transcriptObject: TranscriptObject){
    let TranscriptObject {id, history: _, math: _, literature: _ } = transcriptObject;
    object::delete(id);
}
}
Object Deletion and Struct Unpacking
The delete_transcript method from the example above illustrates how to delete an object on Sui.
- In order to delete an object, you must first unpack the object and retrieve its object ID. Unpacking can only be done inside the module that defines the object due to Move's privileged struct operation rules:
- Struct types can only be created ("packed"), destroyed ("unpacked") inside the module that defines the struct
- The fields of a struct are only accessible inside the module that defines the struct
Following these rules, if you want to modify your struct outside its defining module, you will need to provide public methods for these operations.
- After unpacking the struct and retrieving its ID, the object can be deleted by simply calling the
object::deleteframework method on its object ID.
💡Note: the, _, underscore in the above method denotes unused variables or parameters. This will consume the variable or parameter immediately.
Here is the work-in-progress version of what we have written so far: WIP transcript.move
Object Wrapping
There are multiple ways of nesting an object inside of another object in Sui Move. The first way we will introduce is called object wrapping.
Let's continue our transcript example. We define a new WrappableTranscript type, and the associated wrapper type Folder.
#![allow(unused)]
fn main() {
public struct WrappableTranscript has store {
    history: u8,
    math: u8,
    literature: u8,
}

public struct Folder has key {
    id: UID,
    transcript: WrappableTranscript,
}
}
In the above example, Folder wraps WrappableTranscript, and Folder is addressable through its id as it has the key ability.
Object Wrapping Properties
For a struct type to be capable of being embedded in a Sui object struct, which will generally have the key ability, the embedded struct type must have the store ability.
When an object is wrapped, the wrapped object is no longer accessible independently via object ID. Instead it would just be parts of the wrapper object itself. More importantly, the wrapped object can no longer be passed as an argument in Move calls, and the only access point is through the wrapper object.
Because of this property, object wrapping can be used as a way to make an object inaccessible outside of specific contract calls. For further info about Object wrapping, go check out here.
Object Wrapping Example
We will implement an example of object wrapping to our transcript example, so that WrappableTranscript is wrapped by a Folder object, and so that the Folder object can only be unpacked by, and thus the transcript inside only accessible by an intended address/viewer.
Modify WrappableTranscript and Folder
First, we need to make some adjustments to our two custom types WrappableTranscript and Folder from the previous section
- We need to add the
keyability to our type definitions forWrappableTranscript, so that they become assets and are transferrable.
Remember that custom types with the abilities key and store are considered to be assets in Sui Move.
#![allow(unused)]
fn main() {
public struct WrappableTranscript has key, store {
        id: UID,
        history: u8,
        math: u8,
        literature: u8,
}
}
- We need to add an additional field
intended_addressto theFolderstruct that indicates the address of the intended viewer of the wrapped transcript.
#![allow(unused)]
fn main() {
public struct Folder has key {
    id: UID,
    transcript: WrappableTranscript,
    intended_address: address
}
}
Request Transcript Method
#![allow(unused)]
fn main() {
public fun request_transcript(transcript: WrappableTranscript, intended_address: address, ctx: &mut TxContext){
    let folderObject = Folder {
        id: object::new(ctx),
        transcript,
        intended_address
    };
    //We transfer the wrapped transcript object directly to the intended address
    transfer::transfer(folderObject, intended_address)
}
}
This method simply takes in a WrappableTranscript object and wraps it in a Folder object, and transfers the wrapped transcript to the intended address of the transcript.
Unwrap Transcript Method
#![allow(unused)]
fn main() {
public fun unpack_wrapped_transcript(folder: Folder, ctx: &mut TxContext){
    // Check that the person unpacking the transcript is the intended viewer
    assert!(folder.intended_address == tx_context::sender(ctx), 0);
    let Folder {
        id,
        transcript,
        intended_address:_,
    } = folder;
    transfer::transfer(transcript, tx_context::sender(ctx));
    // Deletes the wrapper Folder object
    object::delete(id)
    }
}
This method unwraps the WrappableTranscript object from the Folder wrapper object if the method caller is the intended viewer of the transcript, and sends it to the method caller.
Quiz: Why do we need to delete the wrapper object here manually? What happens if we don't delete it?
Assert
We used the assert! syntax to verify that the address sending the transaction to unpack the transcript is the same as the intended_address field of the Folder wrapper object.
the assert! macro takes in two parameters of the format:
assert!(<bool expression>, <code>)
where the boolean expression must evaluate to true, otherwise it will abort with error code <code>.
Custom Errors
We are using a default 0 for our error code above, but we can also define a custom error constant in the following way:
#![allow(unused)]
fn main() {
    const ENotIntendedAddress: u64 = 1;
}
This error code then can be consumed at the application level and handled appropriately.
Here is the second work-in-progress version of what we have written so far: WIP transcript.move
Capability Design Pattern
Now we have the basics of a transcript publishing system, we want to add some access control to our smart contract.
Capability is a commonly used pattern in Move that allows fine-tuned access control using an object-centric model. Let's take a look at how we can define this capability object:
#![allow(unused)]
fn main() {
  // Type that marks the capability to create, update, and delete transcripts
public struct TeacherCap has key {
    id: UID
  }
}
We define a new struct TeacherCap that marks the capability to perform privileged actions on transcripts. If we want the capability to be non-transferrable, we simply do not add the store ability to the struct.
*💡Note: This is also how the equivalent of soulbound tokens (SBT) can be easily implemented in Move. You simply define a struct that has the key ability, but not the store ability.
Passing and Consuming Capability Objects
Next, we need to modify the methods which should be callable by someone with the TeacherCap capability object to take in the capability as an extra parameter and consume it immediately.
For example, for the create_wrappable_transcript_object method, we can modify it as the follows:
#![allow(unused)]
fn main() {
    public fun create_wrappable_transcript_object(_: &TeacherCap, history: u8, math: u8, literature: u8, ctx: &mut TxContext) {
        let wrappableTranscript = WrappableTranscript {
            id: object::new(ctx),
            history,
            math,
            literature,
        };
        transfer::transfer(wrappableTranscript, tx_context::sender(ctx))
    }
}
We pass in a reference to TeacherCap capability object and consume it immediately with the _ notation for unused variables and parameters. Note that because we are only passing in a reference to the object, consuming the reference has no effect on the original object.
Quiz: What happens if try to pass in TeacherCap by value?
This means only an address that has a TeacherCap object can call this method, effectively implementing access control on this method.
We make similar modifications to all other methods in the contract that perform privileged actions on transcripts.
Initializer Function
A module's initializer function is called once upon publishing the module. This is useful for initializing the state of the smart contract, and is used often to send out the initial set of capability objects.
In our example, we can define the init method as the following:
#![allow(unused)]
fn main() {
    /// Module initializer is called only once on module publish.
    fun init(ctx: &mut TxContext) {
        transfer::transfer(TeacherCap {
            id: object::new(ctx)
        }, tx_context::sender(ctx))
    }
}
This will create one copy of the TeacherCap object and send it to the publisher's address when the module is first published.
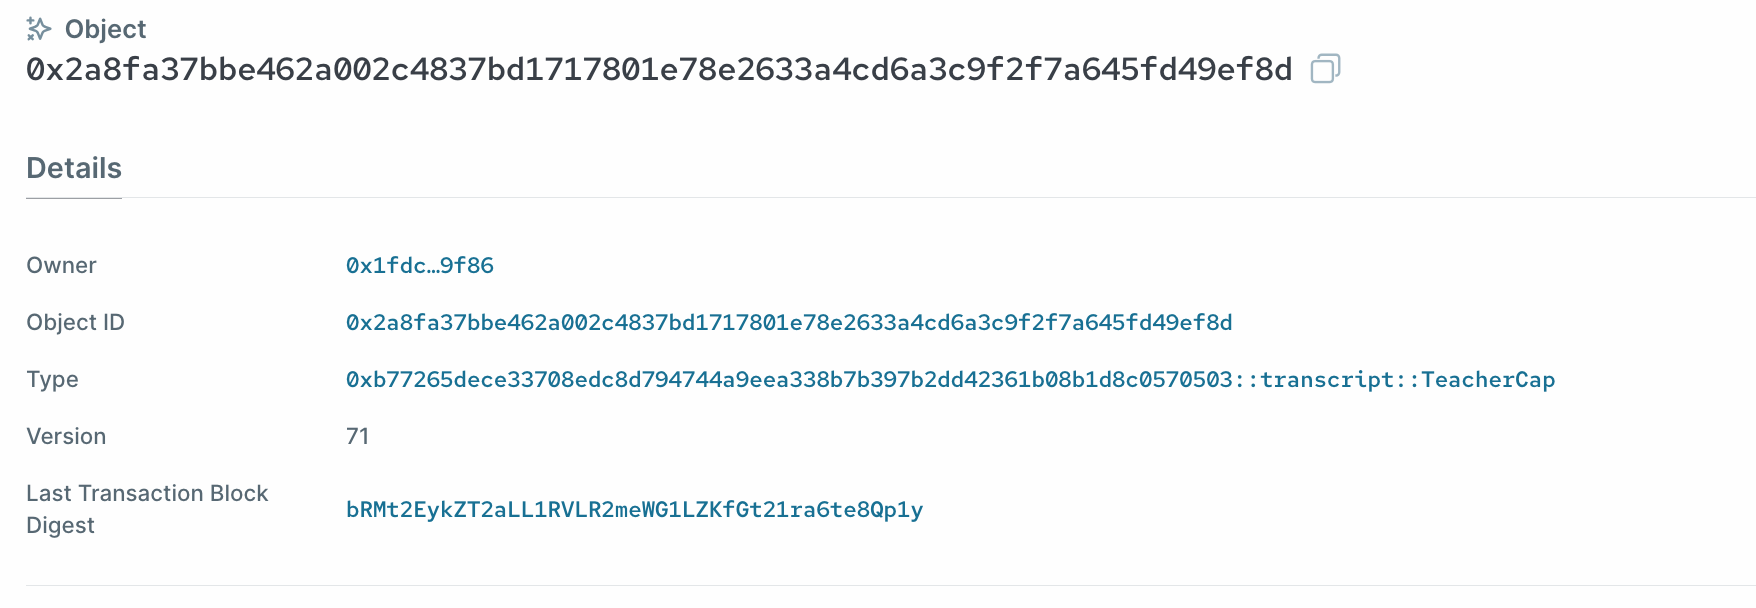
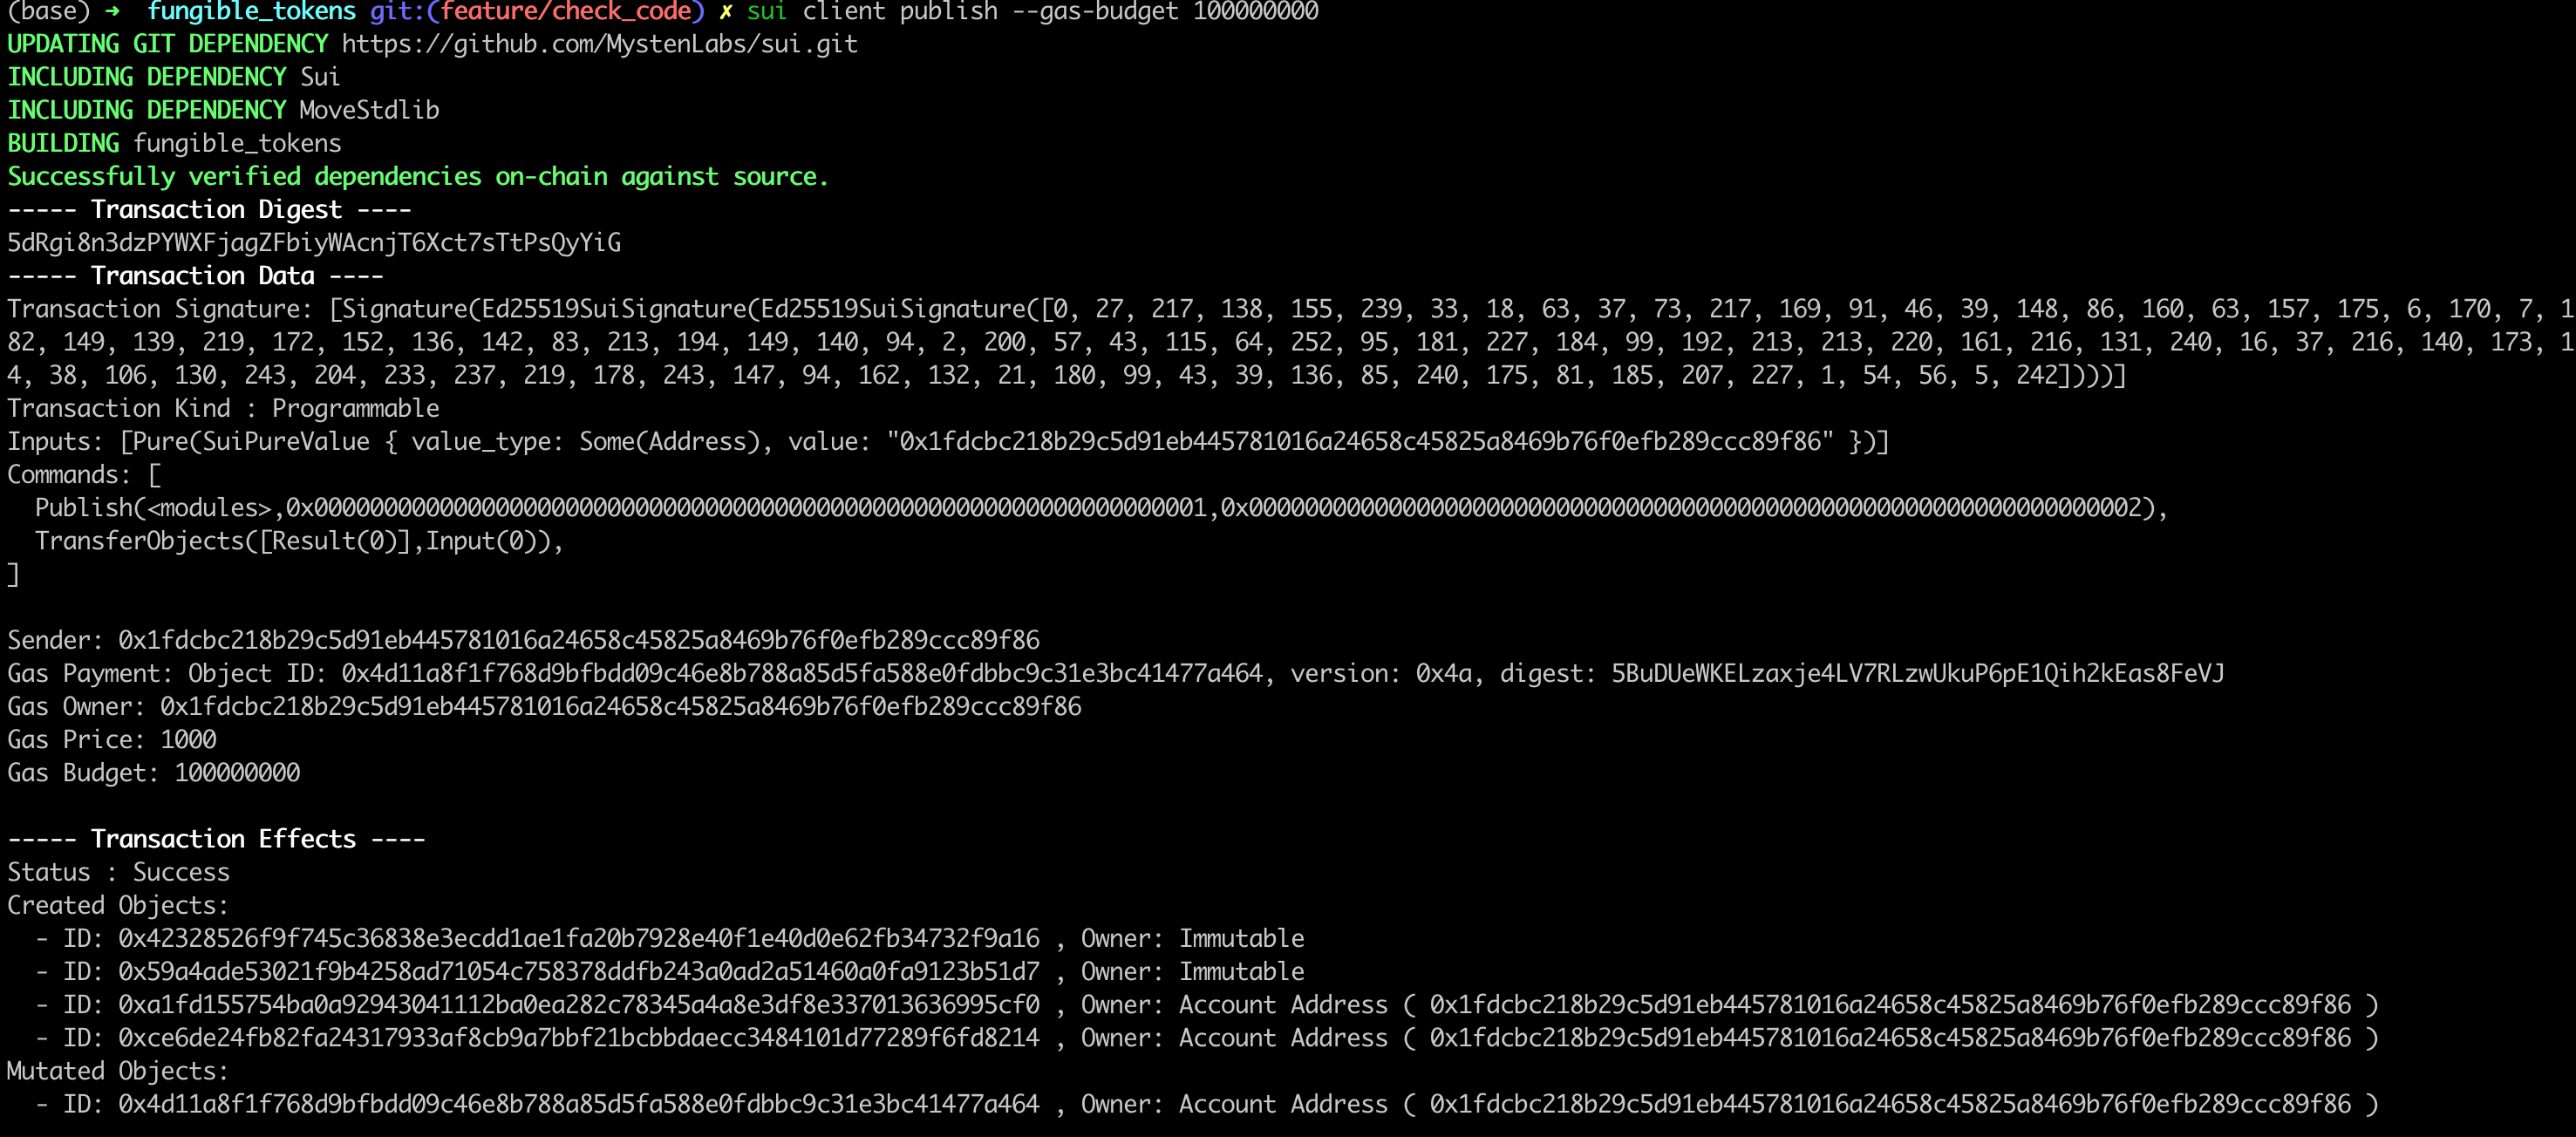
We can see the publish transaction's effects on the Sui Explorer as below:
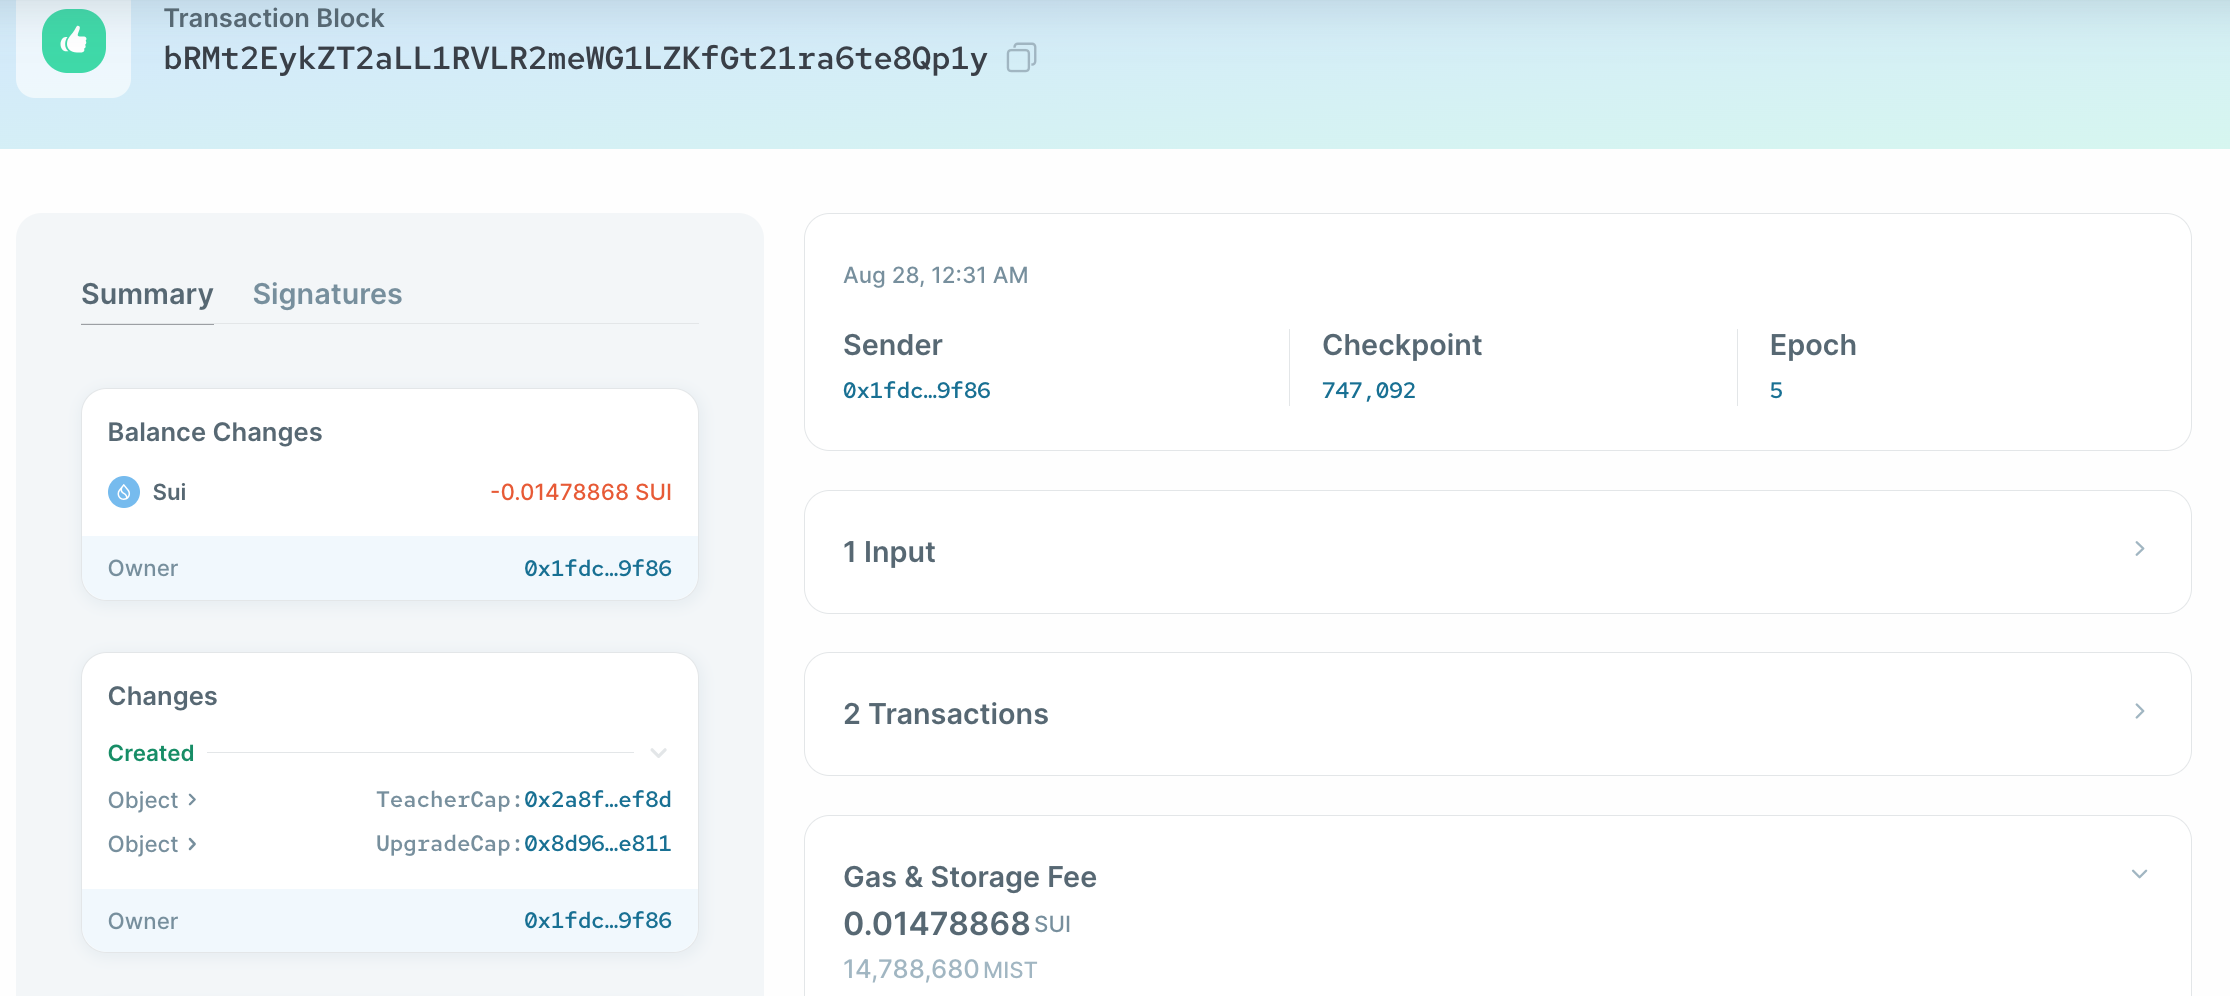
The second object created from the above transaction is an instance of the TeacherCap object, and sent to the publisher address:
Quiz: What was the first object created?
Add Additional Teachers or Admins
In order to give additional addresses admin access, we can simply define a method to create and send additional TeacherCap objects as the following:
#![allow(unused)]
fn main() {
    public fun add_additional_teacher(_: &TeacherCap, new_teacher_address: address, ctx: &mut TxContext){
        transfer::transfer(
            TeacherCap {
                id: object::new(ctx)
            },
        new_teacher_address
        )
    }
}
This method re-uses the TeacherCap to control access, but if needed, you can also define a new capability struct indicating sudo access.
Here is the third work-in-progress version of what we have written so far: WIP transcript.move
Events
Events are important for Sui Move smart contracts, as it is the main way for indexers to track actions on-chain. You can understand it as logging on server backends, and indexers as parsers.
Events on Sui are also represented as objects. There are several types of system level events in Sui, including Move event, Publish event, Transfer object event, and so on. For the full list of system event types, please refer to the Sui Events API page here.
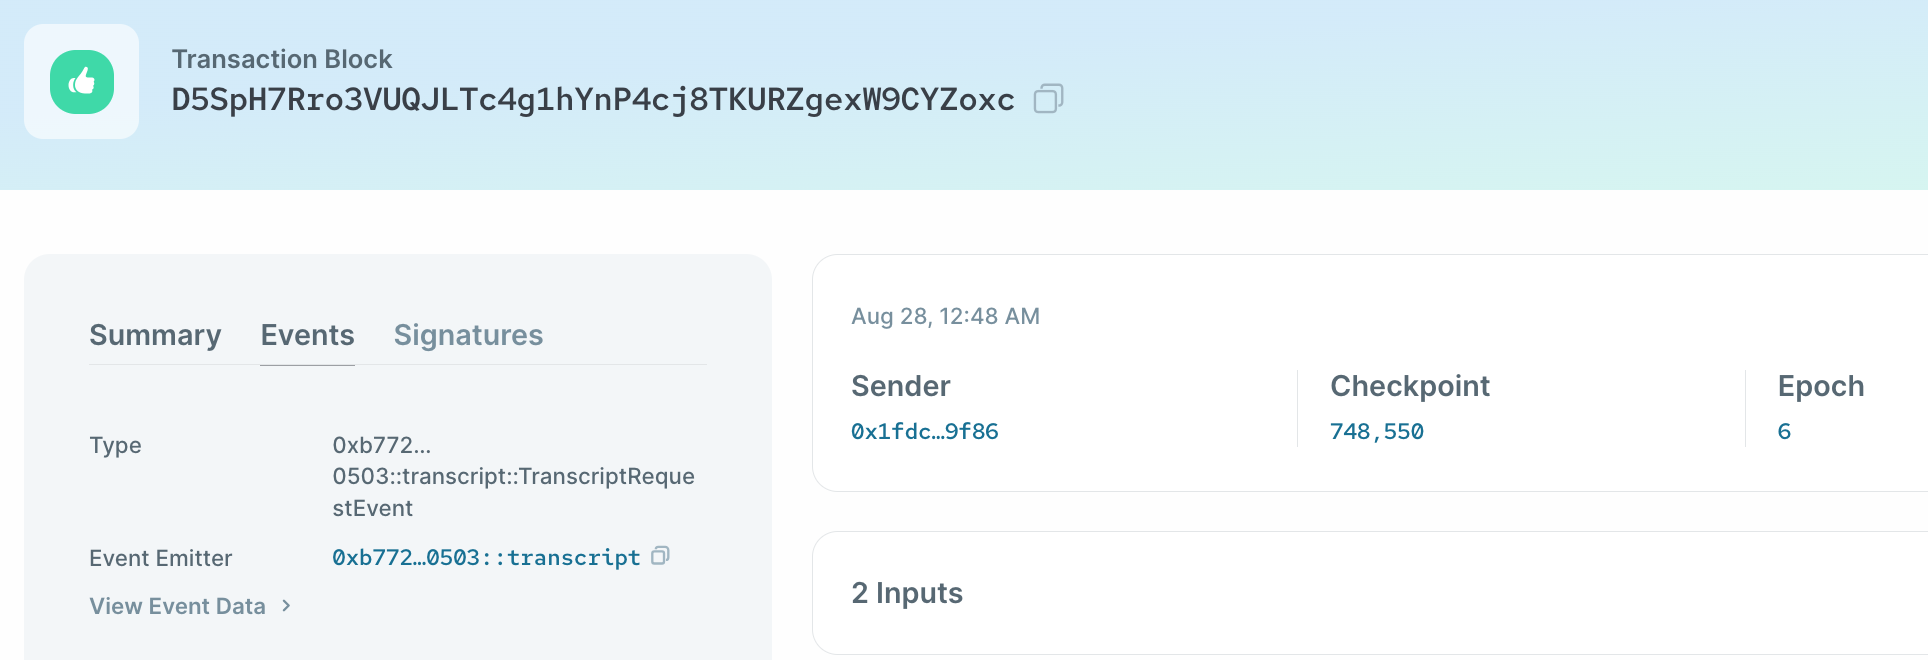
The event details of a transaction can be viewed on the Sui Explorer under the Events tab:
Custom Events
Developers can also define custom events on Sui. We can define a custom event marking when a transcript has been requested in the following way.
#![allow(unused)]
fn main() {
    /// Event marking when a transcript has been requested
    public struct TranscriptRequestEvent has copy, drop {
        // The Object ID of the transcript wrapper
        wrapper_id: ID,
        // The requester of the transcript
        requester: address,
        // The intended address of the transcript
        intended_address: address,
    }
}
The type representing an event has the abilities copy and drop. Event objects aren't representing assets, and we are only interested in the data contained within, so they can be duplicated, and dropped at the end of scopes.
To emit an event in Sui, you just need to use the sui::event::emit method.
Let's modify our request_transcript method to emit this event:
#![allow(unused)]
fn main() {
    public fun request_transcript(transcript: WrappableTranscript, intended_address: address, ctx: &mut TxContext){
        let folderObject = Folder {
            id: object::new(ctx),
            transcript,
            intended_address
        };
        event::emit(TranscriptRequestEvent {
            wrapper_id: object::uid_to_inner(&folderObject.id),
            requester: tx_context::sender(ctx),
            intended_address,
        });
        //We transfer the wrapped transcript object directly to the intended address
        transfer::transfer(folderObject, intended_address);
    }
}
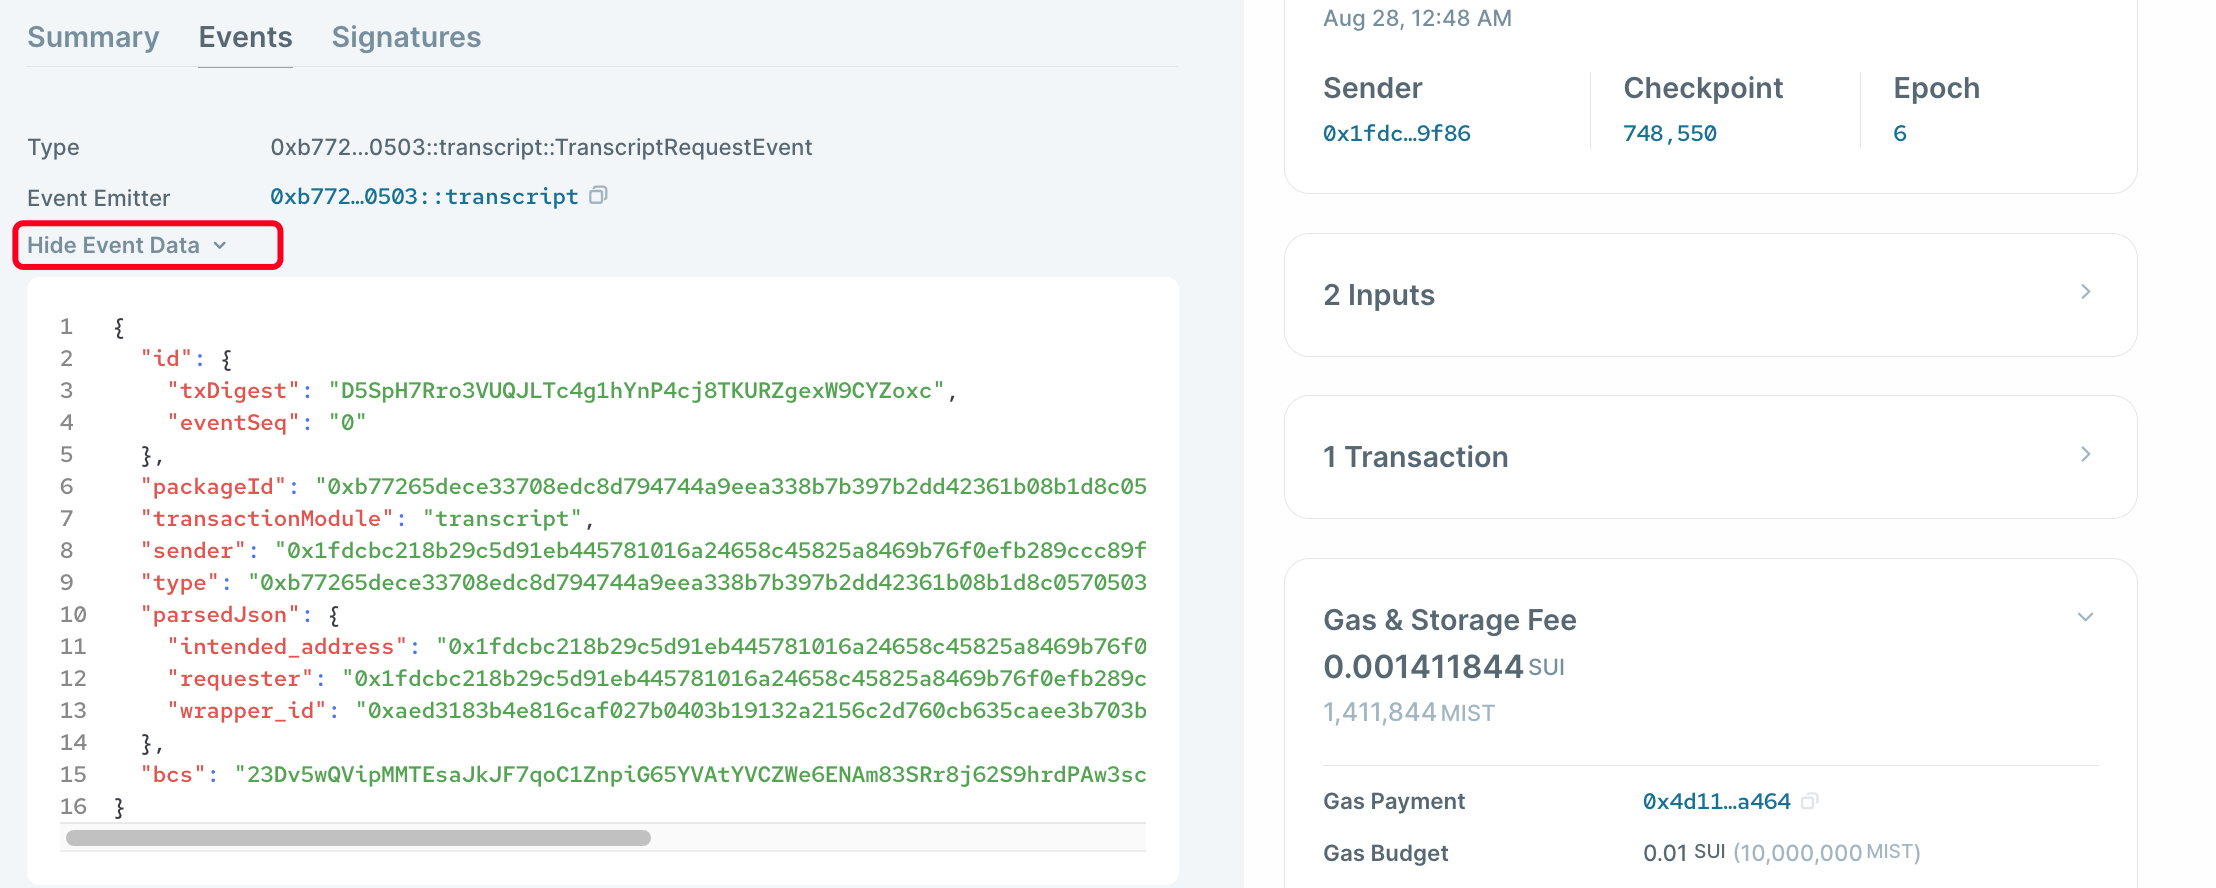
On the Sui explorer, we can see the event emitted displayed as the following, showing the three data fields that we defined in the TranscriptRequestEvent event:
Here is the complete version of the transcript sample project: transcript.move
Try out creating, requesting and unpacking transcripts using the Sui CLI client and the Sui explorer to check the result.
That's the end of Unit 2, great job!
Unit Three
Sui Framework
A common use case for smart contracts is issuing custom fungible tokens (such as ERC-20 tokens on Ethereum). Let's take a look at how that can be done on Sui using the Sui Framework, and some variations on the classic fungible tokens.
Sui Framework
The Sui Framework is Sui's specific implementation of the Move VM. It contains Sui's native API's including its implementation of the Move standard library, as well as Sui-specific operations such as crypto primitives and Sui's implementation of data structures at the framework level.
An implementation of a custom fungible token in Sui will heavily leverage some of the libraries in the Sui Framework.
sui::coin
The main library we will use to implement a custom fungible token on Sui is the sui::coin module.
The resources or methods we will directly use in our fungible token example are:
- Resource: Coin
- Resource: TreasuryCap
- Resource: CoinMetadata
- Method: coin::create_currency
We will revisit each of these in more depth after introducing some new concepts in the next few sections.
Intro to Generics
Generics are abstract stand-ins for concrete types or other properties. They work similarly to generics in Rust, and can be used to allow greater flexibility and avoid logic duplication while writing Sui Move code.
Generics are a key concept in Sui Move, and it's important to understand and have an intuition for how they work, so take your time with this section and understand every part fully.
Generics Usage
Using Generics in Structs
Let's look at a basic example of how to use generics to create a container Box that can hold any type in Sui Move.
First, without generics, we can define a Box that holds a u64 type as the following:
#![allow(unused)]
fn main() {
module  generics::storage {
    public struct Box {
        value: u64
    }
}
}
However, this type will only be able to hold a value of type u64. To make our Box able to hold any generic type, we will need to use generics. The code would be modified as follows:
#![allow(unused)]
fn main() {
module  generics::storage {
    public struct Box<T> {
        value: T
    }
}
}
Ability Constraints
We can add conditions to enforce that the type passed into the generic must have certain abilities. The syntax looks like the following:
#![allow(unused)]
fn main() {
module  generics::storage {
    // T must be copyable and droppable
    public struct Box<T: store + drop> has key, store {
        value: T
    }
}
}
💡It's important to note here that the inner type T in the above example must meet certain ability constraints due to the outer container type. In this example, T must have store, as Box has store and key. However, T can also have abilities that the container doesn't have, such as drop in this example.
The intuition is that if the container is allowed to contain a type that does not follow the same rules that it does, the container would violate its own ability. How can a box be storable if its content isn't also storable?
We will see in the next section that there is a way to get around this rule in certain cases using a special keyword, called phantom.
💡See the generics project under example_projects for some examples of generic types.
Using Generics in Functions
To write a function that returns an instance of Box that can accept a parameter of any type for the value field, we also have to use generics in the function definition. The function can be defined as the following:
#![allow(unused)]
fn main() {
public fun create_box<T>(value: T): Box<T> {
        Box<T> { value }
    }
}
If we want to restrict the function to only accept a specific type for value, we simply specify that type in the function signature as follows:
#![allow(unused)]
fn main() {
public fun create_box(value: u64): Box<u64> {
        Box<u64>{ value }
    }
}
This will only accept inputs of the type u64 for the create_box method, while still using the same generic Box struct.
Calling Functions with Generics
To call a function with a signature that contains generics, we must specify the type in angle brackets, as in the following syntax:
#![allow(unused)]
fn main() {
// value will be of type storage::Box<bool>
    let bool_box = storage::create_box<bool>(true);
// value will be of the type storage::Box<u64>
    let u64_box = storage::create_box<u64>(1000000);
}
Calling Functions with Generics using Sui CLI
To call a function with generics in its signature from the Sui CLI, you must define the argument's type using the flag --type-args.
The following is an example that calls the create_box function to create a box that contains a coin of the type 0x2::sui::SUI:
sui client call --package $PACKAGE --module $MODULE --function "create_box" --args $OBJECT_ID --type-args 0x2::sui::SUI --gas-budget 10000000
Advanced Generics Syntax
For more advanced syntax involving the use of generics in Sui Move, such as multiple generic types, please refer to the excellent section on generics in the Move Book.
But for our current lesson on fungible tokens, you already know enough about how generics work to proceed.
The Witness Design Pattern
Next, we need to understand the witness pattern to peek under the hood of how a fungible token is implemented in Sui Move.
Witness is a design pattern used to prove that the resource or type in question, A, can be initiated only once after the ephemeral witness resource has been consumed. The witness resource must be immediately consumed or dropped after use, ensuring that it cannot be reused to create multiple instances of A.
Witness Pattern Example
In the below example, the witness resource is PEACE, while the type A that we want to control the instantiation of is Guardian.
The witness resource type must have the drop keyword so that this resource can be dropped after being passed into a function. We see that the instance of PEACE resource is passed into the create_guardian method and dropped (note the underscore before witness), ensuring that only one instance of Guardian can be created.
#![allow(unused)]
fn main() {
    /// Module that defines a generic type `Guardian<T>` which can only be
    /// instantiated with a witness.
    module witness::peace {
        use sui::object::{Self, UID};
        use sui::transfer;
        use sui::tx_context::{Self, TxContext};

        /// Phantom parameter T can only be initialized in the `create_guardian`
        /// function. But the types passed here must have `drop`.
        public struct Guardian<phantom T: drop> has key, store {
            id: UID
        }

        /// This type is the witness resource and is intended to be used only once.
        public struct PEACE has drop {}

        /// The first argument of this function is an actual instance of the
        /// type T with `drop` ability. It is dropped as soon as received.
        public fun create_guardian<T: drop>(
            _witness: T, ctx: &mut TxContext
        ): Guardian<T> {
            Guardian { id: object::new(ctx) }
        }

        /// Module initializer is the best way to ensure that the
        /// code is called only once. With `Witness` pattern it is
        /// often the best practice.
        fun init(witness: PEACE, ctx: &mut TxContext) {
            transfer::transfer(
                create_guardian(witness, ctx),
                tx_context::sender(ctx)
            )
        }
    }
}
The example above is modified from the excellent book Sui Move by Example by Damir Shamanaev.
The phantom Keyword
In the above example, we want the Guardian type to have the key and store abilities, so that it's an asset and is transferrable and persists in global storage.
We also want to pass in the witness resource, PEACE, into Guardian, but PEACE only has the drop ability. Recall our previous discussion on ability constraints and inner types, the rule implies that PEACE should also have key and storage given that the outer type Guardian does. But in this case, we do not want to add unnecessary abilities to our witness type, because doing so could cause undesirable behaviors and vulnerabilities.
We can use the keyword phantom to get around this situation. When a type parameter is either not used inside the struct definition or is only used as an argument to another phantom type parameter, we can use the phantom keyword to ask the Move type system to relax the ability constraint rules on inner types. We see that Guardian doesn't use the type T in any of its fields, so we can safely declare T to be a phantom type.
For a more in-depth explanation of the phantom keyword, please check the relevant section of the Move language documentation.
One Time Witness
One Time Witness (OTW) is a sub-pattern of the Witness pattern, where we utilize the module init function to ensure that only one instance of the witness resource is created (so type A is guaranteed to be a singleton).
In Sui Move a type is considered an OTW if its definition has the following properties:
- The type is named after the module but uppercased
- The type only has the
dropability
To get an instance of this type, you need to add it as the first argument to the module init function as in the above example. The Sui runtime will then generate the OTW struct automatically at module publish time.
The above example uses the One Time Witness design pattern to guarantee that Guardian is a singtleton.
The Coin Resource and create_currency Method
Now we know how generics and witness patterns work, let's revisit the Coin resource and the create_currency method.
The Coin Resource
Now we understand how generics work. We can revisit the Coin resource from sui::coin. It's defined as the following:
#![allow(unused)]
fn main() {
public struct Coin<phantom T> has key, store {
        id: UID,
        balance: Balance<T>
    }
}
The Coin resource type is a struct that has a generic type T and two fields, id and balance. id is of the type sui::object::UID, which we have already seen before.
balance is of the type sui::balance::Balance, and is defined as:
#![allow(unused)]
fn main() {
public struct Balance<phantom T> has store {
    value: u64
}
}
Recall our discussion on phantom, The type T is used in Coin only as an argument to another phantom type for Balance, and in Balance, it's not used in any of its fields, thus T is a phantom type parameter.
Coin<T> serves as a transferrable asset representation of a certain amount of the fungible token type T that can be transferred between addresses or consumed by smart contract function calls.
The create_currency Method
Let's look at what coin::create_currency actually does in its source code:
#![allow(unused)]
fn main() {
    public fun create_currency<T: drop>(
        witness: T,
        decimals: u8,
        symbol: vector<u8>,
        name: vector<u8>,
        description: vector<u8>,
        icon_url: Option<Url>,
        ctx: &mut TxContext
    ): (TreasuryCap<T>, CoinMetadata<T>) {
        // Make sure there's only one instance of the type T
        assert!(sui::types::is_one_time_witness(&witness), EBadWitness);

        // Emit Currency metadata as an event.
        event::emit(CurrencyCreated<T> {
            decimals
        });

        (
            TreasuryCap {
                id: object::new(ctx),
                total_supply: balance::create_supply(witness)
            },
            CoinMetadata {
                id: object::new(ctx),
                decimals,
                name: string::utf8(name),
                symbol: ascii::string(symbol),
                description: string::utf8(description),
                icon_url
            }
        )
    }
}
The assert checks that the witness resource passed in is a One Time Witness using the sui::types::is_one_time_witness method from the Sui Framework.
The method creates and returns two objects, one is the TreasuryCap resource and the other is a CoinMetadata resource.
TreasuryCap
The TreasuryCap is an asset and is guaranteed to be a singleton object by the One Time Witness pattern:
#![allow(unused)]
fn main() {
    /// Capability allowing the bearer to mint and burn
    /// coins of type `T`. Transferable
    public struct TreasuryCap<phantom T> has key, store {
            id: UID,
            total_supply: Supply<T>
        }
}
It wraps a singleton field total_supply of type Balance::Supply:
#![allow(unused)]
fn main() {
/// A Supply of T. Used for minting and burning.
    /// Wrapped into a `TreasuryCap` in the `Coin` module.
    public struct Supply<phantom T> has store {
        value: u64
    }
}
Supply<T> tracks the total amount of the given custom fungible token of type T currently circulating. You can see why this field must be a singleton, as having multiple Supply instances for a single token type makes no sense.
CoinMetadata
This is a resource that stores the metadata of the fungible token that has been created. It includes the following fields:
decimals: the precision of this custom fungible tokenname: the name of this custom fungible tokensymbol: the token symbol of this custom fungible tokendescription: the description of this custom fungible tokenicon_url: the URL to the icon file of this custom fungible token
The information contained in CoinMetadata can be thought of as a basic and lightweight fungible token standard of Sui, and can be used by wallets and explorers to display fungible tokens created using the sui::coin module.
Managed Coin Example
Now we have peeked under the hood of the sui::coin module, we can look at a simple but complete example of creating a type of custom fungible token where there is a trusted manager that has the capability to mint and burn, similar to many ERC-20 implementations.
Smart Contract
You can find the complete Managed Coin example contract under the example project folder.
Given what we have covered so far, this contract should be fairly easy to understand. It follows the One Time Witness pattern exactly, where the witness resource is named MANAGED, and automatically created by the module init function.
The init function then calls coin::create_currency to get the TreasuryCap and CoinMetadata resources. The parameters passed into this function are the fields of the CoinMetadata object, so include the token name, symbol, icon URL, etc.
The CoinMetadata is immediately frozen after creation via the transfer::freeze_object method, so that it becomes a shared immutable object that can be read by any address.
The TreasuryCap Capability object is used as a way to control access to the mint and burn methods that create or destroy Coin<MANAGED> objects respectively.
Publishing and CLI Testing
Publish the Module
Under the fungible_tokens project folder, run:
sui client publish --gas-budget 10000000
You should see console output similar to:
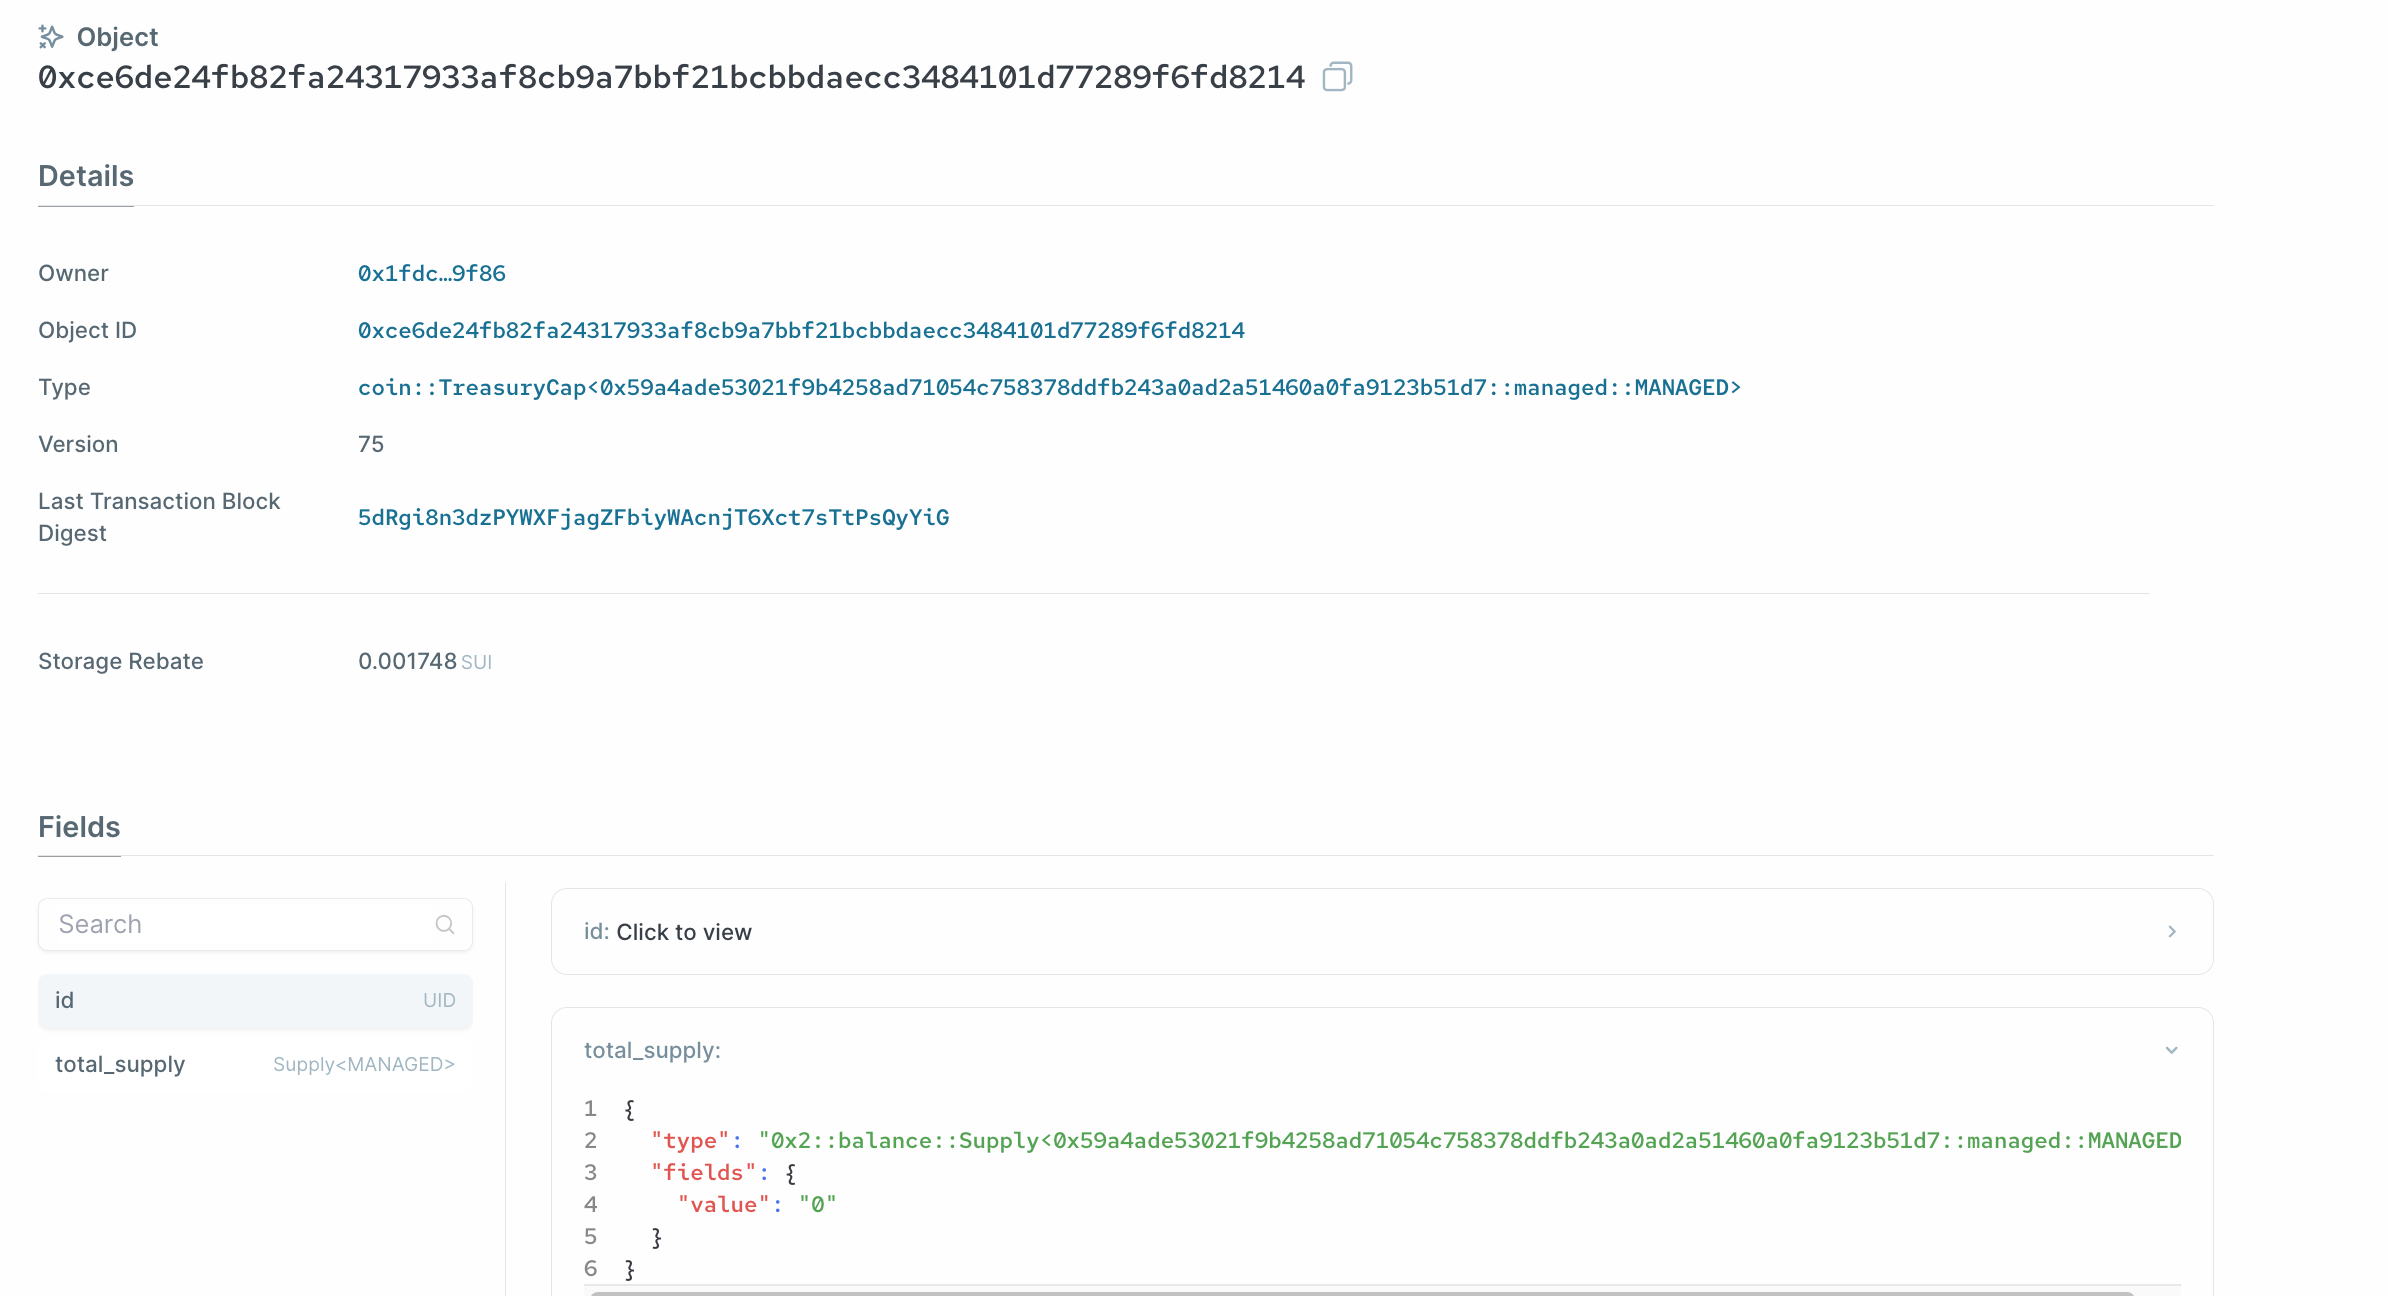
The two immutable objects created are respectively the package itself and the CoinMetadata object of Managed Coin. And the owned object passed to the transaction sender is the TreasuryCap object of Managed Coin.
Export the object IDs of the package object and the TreasuryCap object to environmental variables:
export PACKAGE_ID=<package object ID from previous output>
export TREASURYCAP_ID=<treasury cap object ID from previous output>
Minting Tokens
To mint some MNG tokens, we can use the following CLI command:
sui client call --function mint --module managed --package $PACKAGE_ID --args $TREASURYCAP_ID <amount to mint> <recipient address> --gas-budget 10000000
💡Note: as of Sui binary version 0.21.0, u64 inputs must be escaped as strings, thus the above CLI command format. This might change in a future version.
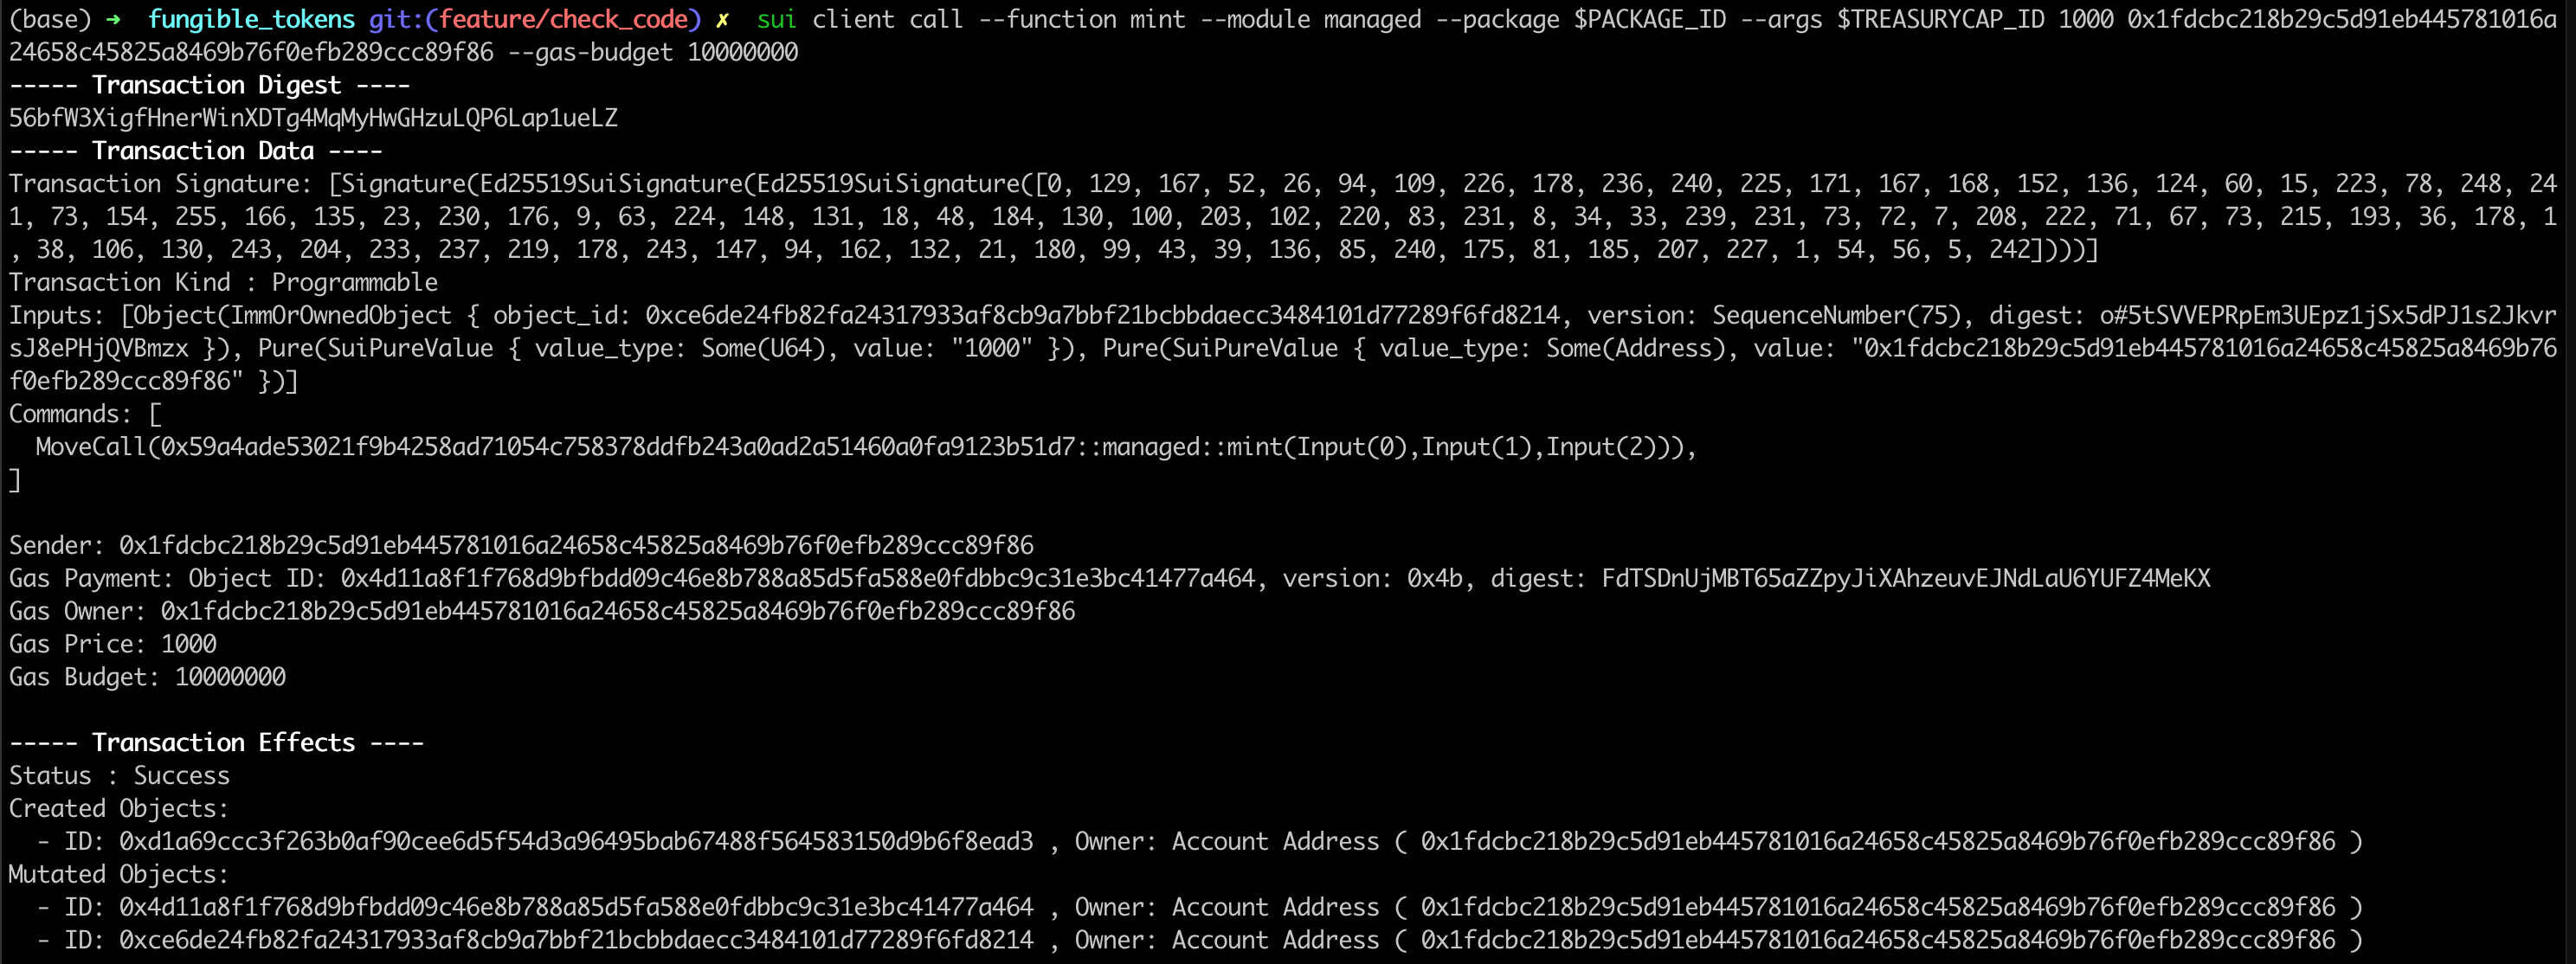
Export the object ID of the newly minted COIN<MANAGED> object to a bash variable:
export COIN_ID=<coin object ID from previous output>
Verify that the Supply field under the TreasuryCap<MANAGED> object should be increased by the amount minted.
Burning Tokens
To burn an existing COIN<MANAGED> object, we use the following CLI command:
sui client call --function burn --module managed --package $PACKAGE_ID --args $TREASURYCAP_ID $COIN_ID --gas-budget 10000000
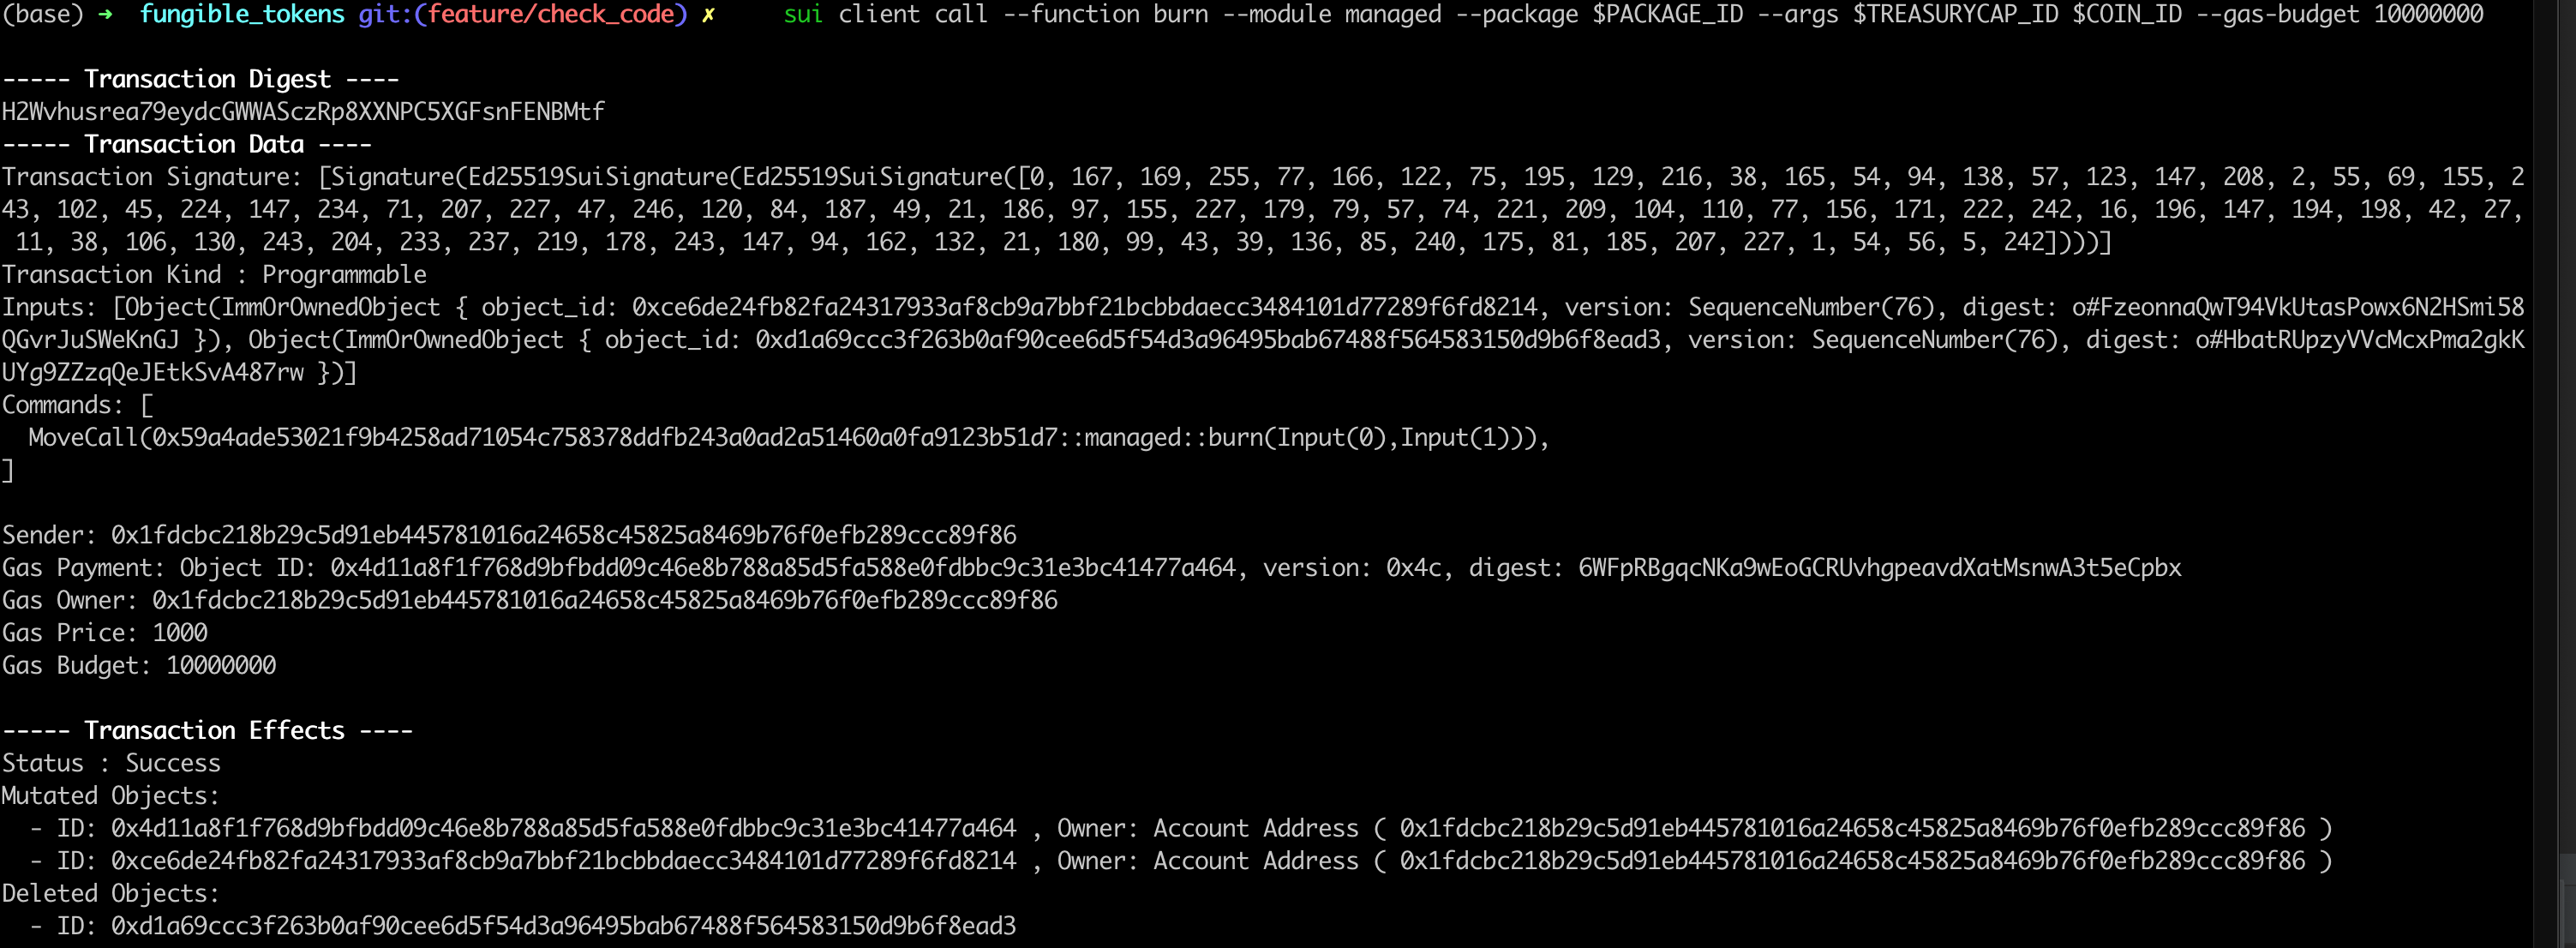
Verify that the Supply field under the TreasuryCap<MANAGED> object should be back to 0.
Exercise: What other commonly used functions do fungible tokens need? You should know enough about programming in Move now to try to implement some of these functions.
Clock and Locked Coin Example
In the second fungible token example, we will introduce how to obtain time on-chain in Sui, and how to utilize that to implement a vesting mechanism for a coin.
Clock
Sui Framework has a native clock module that makes timestamps available in Move smart contracts.
The main method that you will need to access is the following:
public fun timestamp_ms(clock: &clock::Clock): u64
the timestamp_ms function returns the current system timestamp, as a running total of milliseconds since an arbitrary point in the past.
The clock object has a special reserved identifier, 0x6, that needs to be passed into function calls using it as one of the inputs.
Locked Coin
Now that we know how to access time on-chain through clock, implementing a vesting fungible token is relatively straight forward.
Locker Custom Type
locked_coin builds on top of the managed_coin implementation with the addition of one more custom type, Locker:
#![allow(unused)]
fn main() {
    /// Transferrable object for storing the vesting coins
    ///
    public struct Locker has key, store {
        id: UID,
        start_date: u64,
        final_date: u64,
        original_balance: u64,
        current_balance: Balance<LOCKED_COIN>

    }
}
Locker is a transferrable asset that encodes the information related to the vesting schedule and vesting status of tokens issued.
start_date and final_date are timestamps obtained from clock, marking the start and end of the vesting term.
original_balance is the initial balance issued into a Locker, balance is the current and remaining balance taking account any vested portion that's already withdrawn.
Minting
In the locked_mint method, we create and transfer a Locker with the specified amount of tokens and vesting scheduled encoded:
#![allow(unused)]
fn main() {
    /// Mints and transfers a locker object with the input amount of coins and specified vesting schedule
    ///
    public fun locked_mint(treasury_cap: &mut TreasuryCap<LOCKED_COIN>, recipient: address, amount: u64, lock_up_duration: u64, clock: &Clock, ctx: &mut TxContext){

        let coin = coin::mint(treasury_cap, amount, ctx);
        let start_date = clock::timestamp_ms(clock);
        let final_date = start_date + lock_up_duration;

        transfer::public_transfer(Locker {
            id: object::new(ctx),
            start_date: start_date,
            final_date: final_date,
            original_balance: amount,
            current_balance: coin::into_balance(coin)
        }, recipient);
    }
}
Note how clock is used here to get the current timestamp.
Withdrawing
The withdraw_vested method contains the majority of the logic to compute the vested amounts:
#![allow(unused)]
fn main() {
    /// Withdraw the available vested amount assuming linear vesting
    ///
    public fun withdraw_vested(locker: &mut Locker, clock: &Clock, ctx: &mut TxContext){
        let total_duration = locker.final_date - locker.start_date;
        let elapsed_duration = clock::timestamp_ms(clock) - locker.start_date;
        let total_vested_amount = if (elapsed_duration > total_duration) {
            locker.original_balance
        } else {
            locker.original_balance * elapsed_duration / total_duration
        };
        let available_vested_amount = total_vested_amount - (locker.original_balance-balance::value(&locker.current_balance));
        transfer::public_transfer(coin::take(&mut locker.current_balance, available_vested_amount, ctx), sender(ctx))
    }
}
This example assumes a simple linear vesting schedule, but can be modified to accommodate a wide range of vesting logic and schedule.
Full Contract
You can find the full smart contract for our implementation of a locked_coin under the example_projects/locked_coin folder.
Unit Testing
Sui supports the Move Testing Framework. Here, we will create some unit tests for Managed Coin to show how to write unit tests and run them.
Testing Environment
Sui Move test code is just like any other Sui Move code, but it has special annotations and functions to distinguish it from the actual production code.
Test functions or modules start with the #[test] or #[test_only] annotation.
#![allow(unused)]
fn main() {
#[test_only]
module fungible_tokens::managed_tests {
  #[test]
  fun mint_burn() {
  }
}
}
We will put the unit tests for Managed Coin into a separate testing module called managed_tests.
Each function inside this module can be seen as one unit test consisting of one or more transactions. We'll write one unit test called mint_burn.
Test Scenario
Inside the testing environment, we will be mainly leveraging the test_scenario package to simulate a runtime environment. The main object we need to understand and interact with here is the Scenario object. A Scenario simulates a multi-transaction sequence, and it can be initialized with the sender address as follows:
#![allow(unused)]
fn main() {
  // Initialize a mock sender address
  let addr1 = @0xA;
  // Begins a multi-transaction scenario with addr1 as the sender
  let scenario = test_scenario::begin(addr1);
  ...
  // Cleans up the scenario object
  test_scenario::end(scenario);
}
💡Note that the Scenario object is not droppable, so it must be explicitly cleaned up at the end of its scope using test_scenario::end.
Initializing the Module State
To test our Managed Coin module, we need first to initialize the module state. Given that our module has an init function, we need to first create a test_only init function inside the managed module:
#![allow(unused)]
fn main() {
#[test_only]
    /// Wrapper of module initializer for testing
    public fun test_init(ctx: &mut TxContext) {
        init(MANAGED {}, ctx)
    }
}
This is essentially a mock init function that can only be used for testing. Then we can initialize the runtime state in our scenario by simply calling this function:
#![allow(unused)]
fn main() {
    // Run the managed coin module init function
    {
        managed::test_init(ctx(&mut scenario))
    };
}
Minting
We use the next_tx method to advance to the next transaction in our scenario where we want to mint a Coin<MANAGED> object.
To do this, we need first to extract the TreasuryCap<MANAGED> object. We use a special testing function called take_from_sender to retrieve this from our scenario. Note that we need to pass into take_from_sender the type parameter of the object we are trying to retrieve.
Then we simply call the managed::mint using all the necessary parameters.
At the end of this transaction, we must return the TreasuryCap<MANAGED> object to the sender address using test_scenario::return_to_address.
#![allow(unused)]
fn main() {
next_tx(&mut scenario, addr1);
        {
            let treasurycap = test_scenario::take_from_sender<TreasuryCap<MANAGED>>(&scenario);
            managed::mint(&mut treasurycap, 100, addr1, test_scenario::ctx(&mut scenario));
            test_scenario::return_to_address<TreasuryCap<MANAGED>>(addr1, treasurycap);
        };
}
Burning
To test burning a token, the procedure is very similar to testing minting. The only difference is that we must also retrieve a Coin<MANAGED> object from the person it was minted to.
Running Unit Tests
The full managed_tests module source code can be found under example_projects folder.
To execute the unit tests, navigate to the project directory in CLI and enter the following command:
sui move test
You should see console output indicating which unit tests have passed or failed.

Homogeneous Collections
Before we delve into the main topic of building a marketplace on Sui, let's learn about collections in Move first.
vectors
Vector in Move is similar to those in other languages such as C++. It's a way to dynamically allocate memory at runtime and manage a group of a single type, which can be a specific type or a generic type.
See the included example code for defining a vector and its basic operations.
#![allow(unused)]
fn main() {
module collection::vector {

    use std::vector;

    public struct Widget {
    }

    // Vector for a specified  type
    public struct WidgetVector {
        widgets: vector<Widget>
    }

    // Vector for a generic type
    public struct GenericVector<T> {
        values: vector<T>
    }

    // Creates a GenericVector that holds a generic type T
    public fun create<T>(): GenericVector<T> {
        GenericVector<T> {
            values: vector::empty<T>()
        }
    }

    // Push a value of type T into a GenericVector
    public fun put<T>(vec: &mut GenericVector<T>, value: T) {
        vector::push_back<T>(&mut vec.values, value);
    }

    // Pops a value of type T from a GenericVector
    public fun remove<T>(vec: &mut GenericVector<T>): T {
        vector::pop_back<T>(&mut vec.values)
    }

    // Returns the size of a given GenericVector
    public fun size<T>(vec: &mut GenericVector<T>): u64 {
        vector::length<T>(&vec.values)
    }
}

}
It's important to note that while a vector defined with a generic type can accept objects of an arbitrary type, all objects in the collection still must be the same type, that is, the collection is homogeneous.
Table
A Table is a map-like collection that dynamically stores key-value pairs. But unlike a traditional map collection, its keys and values are not stored within the Table value, but instead are stored using Sui's object system. The Table struct acts only as a handle into the object system to retrieve those keys and values.
The key type of a Table must have the ability constraint of copy + drop + store, and the value type must have the ability constraint of store.
Table is also a type of homogeneous collection where the key and value fields can be specified or generic types, but all values and all keys in a Table collection must be of the same type.
Quiz: Would two table objects containing the exact same key-value pairs be equal to each other when checked with the === operator? Try it out.
See the below example for working with Table collections:
#![allow(unused)]
fn main() {
module collection::table {

    use sui::table::{Table, Self};
    use sui::tx_context::{TxContext};

    // Defining a table with specified types for the key and value
    public struct IntegerTable {
        table_values: Table<u8, u8>
    }

    // Defining a table with generic types for the key and value
    public struct GenericTable<phantom K: copy + drop + store, phantom V: store> {
        table_values: Table<K, V>
    }

    // Create a new, empty GenericTable with key type K, and value type V
    public fun create<K: copy + drop + store, V: store>(ctx: &mut TxContext): GenericTable<K, V> {
        GenericTable<K, V> {
            table_values: table::new<K, V>(ctx)
        }
    }

    // Adds a key-value pair to GenericTable
    public fun add<K: copy + drop + store, V: store>(table: &mut GenericTable<K, V>, k: K, v: V) {
        table::add(&mut table.table_values, k, v);
    }

    /// Removes the key-value pair in the GenericTable `table: &mut Table<K, V>` and returns the value.
    public fun remove<K: copy + drop + store, V: store>(table: &mut GenericTable<K, V>, k: K): V {
        table::remove(&mut table.table_values, k)
    }

    // Borrows an immutable reference to the value associated with the key in GenericTable
    public fun borrow<K: copy + drop + store, V: store>(table: &GenericTable<K, V>, k: K): &V {
        table::borrow(&table.table_values, k)
    }

    /// Borrows a mutable reference to the value associated with the key in GenericTable
    public fun borrow_mut<K: copy + drop + store, V: store>(table: &mut GenericTable<K, V>, k: K): &mut V {
        table::borrow_mut(&mut table.table_values, k)
    }

    /// Check if a value associated with the key exists in the GenericTable
    public fun contains<K: copy + drop + store, V: store>(table: &GenericTable<K, V>, k: K): bool {
        table::contains<K, V>(&table.table_values, k)
    }

    /// Returns the size of the GenericTable, the number of key-value pairs
    public fun length<K: copy + drop + store, V: store>(table: &GenericTable<K, V>): u64 {
        table::length(&table.table_values)
    }

}
}
Dynamic Fields
To peek under how collections like Table are actually implemented in Sui Move, we need to introduce the concept of dynamic fields in Sui Move. Dynamic fields are heterogeneous fields that can be added or removed at runtime, and can have arbitrary user-assigned names.
There are two sub-types of dynamic fields:
- Dynamic Fields can store any value that has the
storeability, however, an object stored in this kind of field will be considered wrapped and will not be accessible directly via its ID by external tools (explorers, wallets, etc) accessing storage. - Dynamic Object Fields values must be Sui objects (have the
keyandstoreabilities, andid: UIDas the first field), but will still be directly accessible via their object ID after being attached.
Dynamic Field Operations
Adding a Dynamic Field
To illustrate how to work with dynamic fields, we define the following structs:
#![allow(unused)]
fn main() {
   // Parent struct
    public struct Parent has key {
        id: UID,
    }

    // Dynamic field child struct type containing a counter
    public struct DFChild has store {
        count: u64
    }

    // Dynamic object field child struct type containing a counter
    public struct DOFChild has key, store {
        id: UID,
        count: u64,
    }
}
Here's the API to use for adding dynamic fields or dynamic object fields to an object:
#![allow(unused)]
fn main() {
  module collection::dynamic_fields {

      use sui::dynamic_object_field as ofield;
      use sui::dynamic_field as field;

    // Adds a DFChild to the parent object under the provided name
    public fun add_dfchild(parent: &mut Parent, child: DFChild, name: vector<u8>) {
        field::add(&mut parent.id, name, child);
    }

    // Adds a DOFChild to the parent object under the provided name
    public fun add_dofchild(parent: &mut Parent, child: DOFChild, name: vector<u8>) {
        ofield::add(&mut parent.id, name, child);
    }
  }
}
Accessing and Mutating a Dynamic Field
Dynamic fields and dynamic object fields can be read or accessed as the following:
#![allow(unused)]
fn main() {
    // Borrows a reference to a DOFChild
    public fun borrow_dofchild(child: &DOFChild): &DOFChild {
        child
    }

    // Borrows a reference to a DFChild via its parent object
    public fun borrow_dfchild_via_parent(parent: &Parent, child_name: vector<u8>): &DFChild {
        field::borrow<vector<u8>, DFChild>(&parent.id, child_name)
    }

    // Borrows a reference to a DOFChild via its parent object
    public fun borrow_dofchild_via_parent(parent: &Parent, child_name: vector<u8>): &DOFChild {
        ofield::borrow<vector<u8>, DOFChild>(&parent.id, child_name)
    }
}
Dynamic fields and dynamic object fields can also be mutated as the following:
#![allow(unused)]
fn main() {
    // Mutate a DOFChild directly
    public fun mutate_dofchild(child: &mut DOFChild) {
        child.count = child.count + 1;
    }

    // Mutate a DFChild directly
    public fun mutate_dfchild(child: &mut DFChild) {
        child.count = child.count + 1;
    }

    // Mutate a DFChild's counter via its parent object
    public fun mutate_dfchild_via_parent(parent: &mut Parent, child_name: vector<u8>) {
        let child = field::borrow_mut<vector<u8>, DFChild>(&mut parent.id, child_name);
        child.count = child.count + 1;
    }

    // Mutate a DOFChild's counter via its parent object
    public fun mutate_dofchild_via_parent(parent: &mut Parent, child_name: vector<u8>) {
        mutate_dofchild(ofield::borrow_mut<vector<u8>, DOFChild>(
            &mut parent.id,
            child_name,
        ));
    }
}
Quiz: Why can mutate_dofchild be an entry function but not mutate_dfchild?
Removing a Dynamic Field
We can remove a dynamic field from its parent object as follows:
#![allow(unused)]
fn main() {
    // Removes a DFChild given its name and parent object's mutable reference, and returns it by value
    public fun remove_dfchild(parent: &mut Parent, child_name: vector<u8>): DFChild {
        field::remove<vector<u8>, DFChild>(&mut parent.id, child_name)
    }

    // Deletes a DOFChild given its name and parent object's mutable reference
    public fun delete_dofchild(parent: &mut Parent, child_name: vector<u8>) {
        let DOFChild { id, count: _ } = ofield::remove<vector<u8>, DOFChild>(
            &mut parent.id,
            child_name,
        );
        object::delete(id);
    }

    // Removes a DOFChild from the parent object and transfers it to the caller
    public fun reclaim_dofchild(parent: &mut Parent, child_name: vector<u8>, ctx: &mut TxContext) {
        let child = ofield::remove<vector<u8>, DOFChild>(
            &mut parent.id,
            child_name,
        );
        transfer::transfer(child, tx_context::sender(ctx));
    }
}
Note that in the case of a dynamic object field, we can delete or transfer it after removing its attachment to another object, as a dynamic object field is a Sui object. But we cannot do the same with a dynamic field, as it does not have the key ability and is not a Sui object.
Dynamic Field vs. Dynamic Object Field
When should you use a dynamic field versus a dynamic object field? Generally speaking, we want to use dynamic object fields when the child type in question has the key ability and use dynamic fields otherwise.
For a full explanation of the underlying reason, please check this forum post by @sblackshear.
Revisiting Table
Now we understand how dynamic fields work, we can think of the Table collection as a thin wrapper around dynamic field operations.
You can look through the source code of the Table type in Sui as an exercise, and see how each of the previously introduced operations map to dynamic field operations and with some additional logic to keep track of the size of the Table.
Heterogeneous Collections
Homogeneous collections like Vector and Table can work for marketplaces (or other types of applications) where we need to hold a collection of objects of the same type, but what if we need to hold objects of different types, or if we do not know at compile time what types the objects we need to hold are going to be?
For this type of marketplace, we need to use a heterogeneous collection to hold the items to be sold. Already having done the heavy lifting of understanding dynamic fields, heterogeneous collection in Sui should be very easy to understand. We will look at the Bag collection type more closely here.
The Bag Type
A Bag is a heterogeneous map-like collection. The collection is similar to Table in that its keys and values are not stored within the Bag value, but instead are stored using Sui's object system. The Bag struct acts only as a handle into the object system to retrieve those keys and values.
Common Bag Operations
Sample code of common Bag operations is included below:
#![allow(unused)]
fn main() {
module collection::bag {

    use sui::bag::{Bag, Self};
    use sui::tx_context::{TxContext};

    // Defining a table with generic types for the key and value
    public struct GenericBag {
       items: Bag
    }

    // Create a new, empty GenericBag
    public fun create(ctx: &mut TxContext): GenericBag {
        GenericBag{
            items: bag::new(ctx)
        }
    }

    // Adds a key-value pair to GenericBag
    public fun add<K: copy + drop + store, V: store>(bag: &mut GenericBag, k: K, v: V) {
       bag::add(&mut bag.items, k, v);
    }

    /// Removes the key-value pair from the GenericBag with the provided key and returns the value.
    public fun remove<K: copy + drop + store, V: store>(bag: &mut GenericBag, k: K): V {
        bag::remove(&mut bag.items, k)
    }

    // Borrows an immutable reference to the value associated with the key in GenericBag
    public fun borrow<K: copy + drop + store, V: store>(bag: &GenericBag, k: K): &V {
        bag::borrow(&bag.items, k)
    }

    /// Borrows a mutable reference to the value associated with the key in GenericBag
    public fun borrow_mut<K: copy + drop + store, V: store>(bag: &mut GenericBag, k: K): &mut V {
        bag::borrow_mut(&mut bag.items, k)
    }

    /// Check if a value associated with the key exists in the GenericBag
    public fun contains<K: copy + drop + store>(bag: &GenericBag, k: K): bool {
        bag::contains<K>(&bag.items, k)
    }

    /// Returns the size of the GenericBag, the number of key-value pairs
    public fun length(bag: &GenericBag): u64 {
        bag::length(&bag.items)
    }
}
}
The function signatures for interacting with Bag collections are very similar to the function signatures for interacting with Table collections. The main difference is that you don't need to declare any types when creating a new Bag, and the key-value pairs that you add to a Bag can be of different types.
Marketplace Contract
Now that we have a solid understanding of how various types of collections and dynamic fields work, we can start writing the contract for an on-chain marketplace that can support the following features:
- Listing of arbitrary item types and numbers
- Accepts payment in a custom or native fungible token type
- Can concurrently allow multiple sellers to list their items and securely receive payments
Type Definitions
First, we define the overall Marketplace struct:
#![allow(unused)]
fn main() {
    /// A shared `Marketplace`. Can be created by anyone using the
    /// `create` function. One instance of `Marketplace` accepts
    /// only one type of Coin - `COIN` for all its listings.
    public struct Marketplace<phantom COIN> has key {
        id: UID,
        items: Bag,
        payments: Table<address, Coin<COIN>>
    }
}
Marketplace will be a shared object that can be accessed and mutated by anyone. It accepts a COIN generic type parameter that defines what fungible token type the payments will be accepted in.
The items field will hold item listings, which can be different types, thus we use the heterogeneous Bag collection here.
The payments field will hold payments received by each seller. This can be represented by a key-value pair with the seller's address as the key and the coin type accepted as the value. Because the types for the key and value here are homogeneous and fixed, we can use the Table collection type for this field.
Quiz: How would you modify this struct to accept multiple fungible token types?
Next, we define a Listing type:
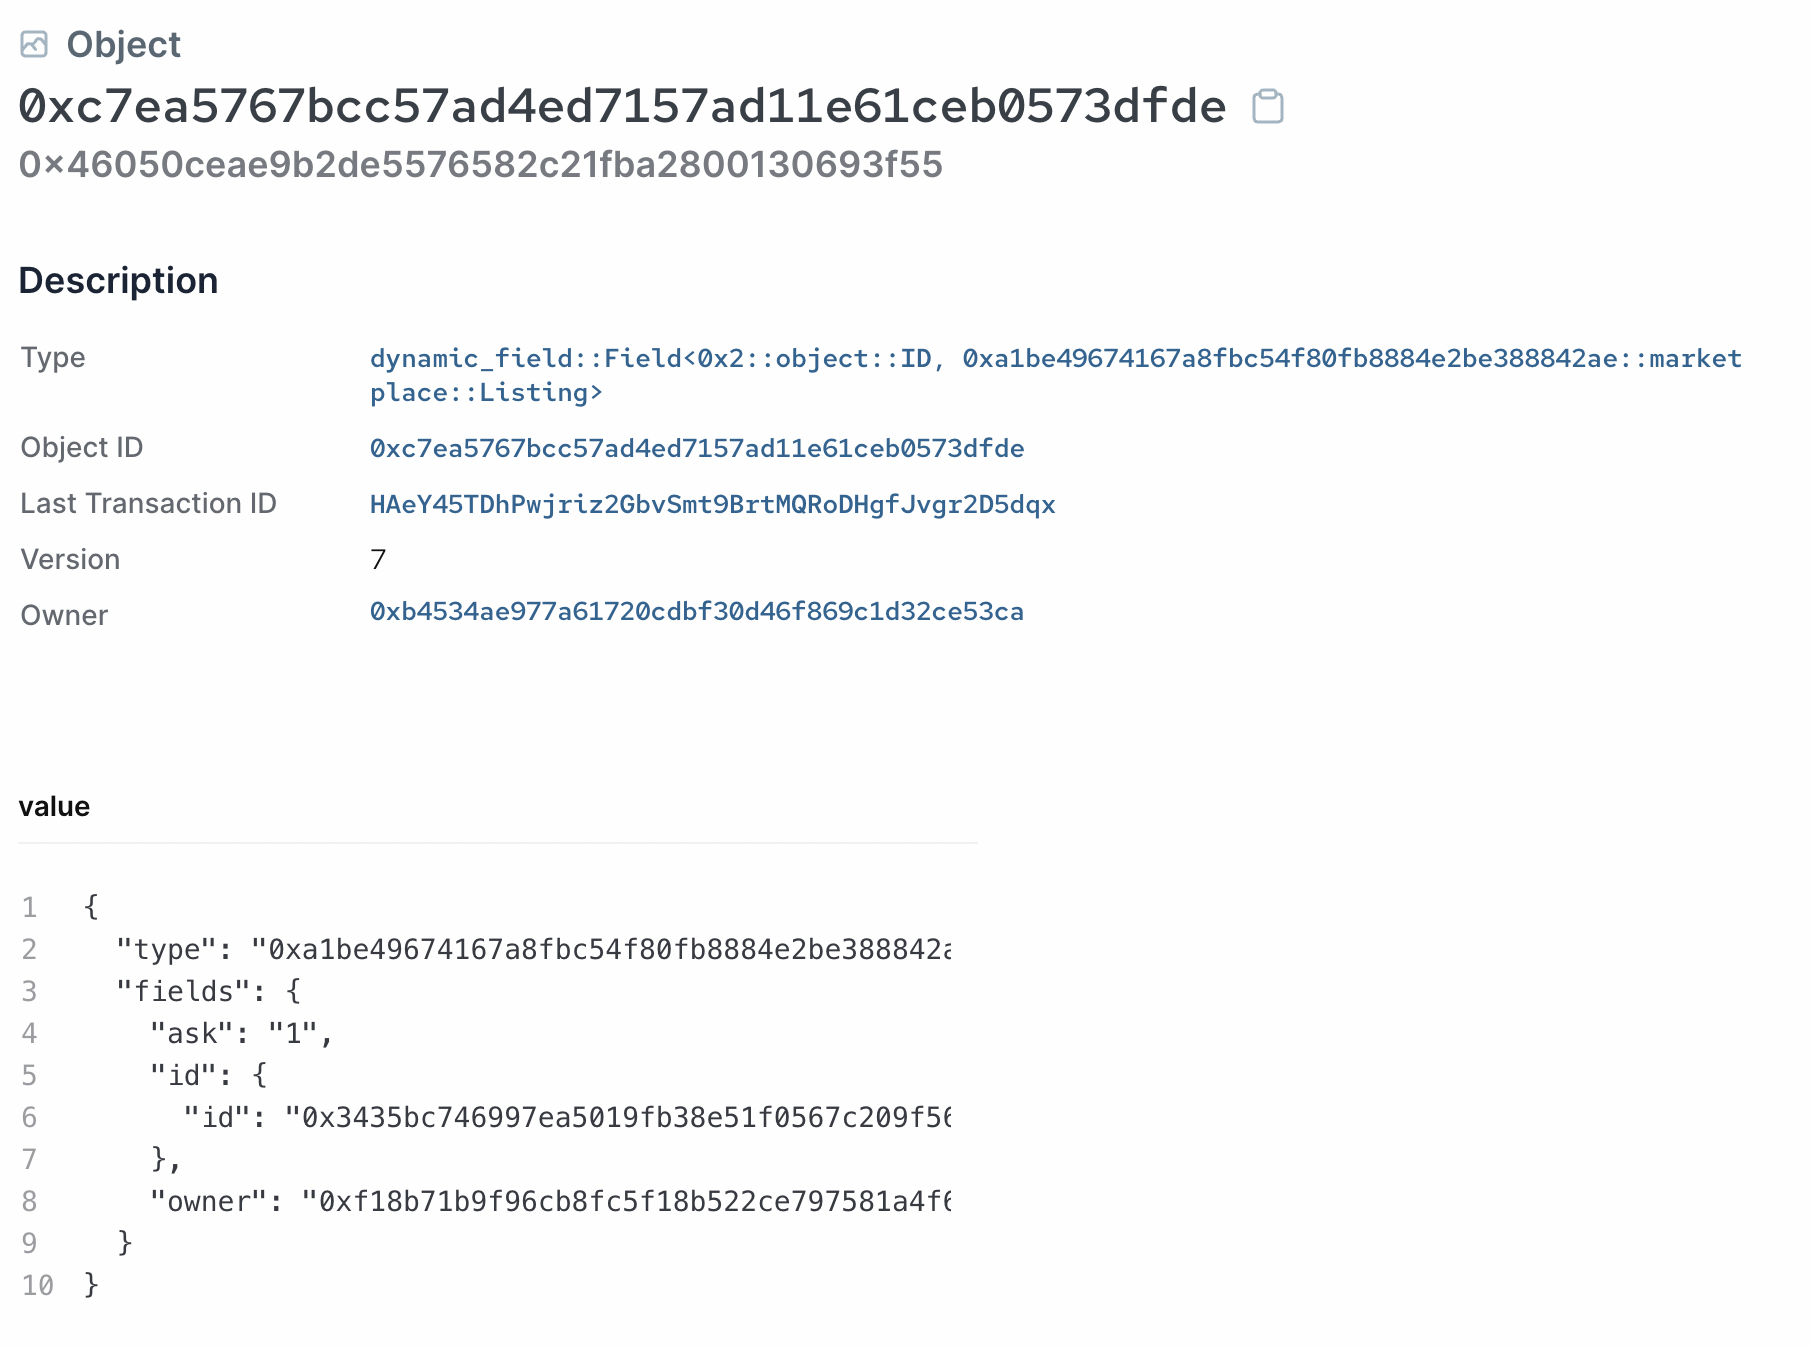
#![allow(unused)]
fn main() {
    /// A single listing that contains the listed item and its
    /// price in [`Coin<COIN>`].
    public struct Listing has key, store {
        id: UID,
        ask: u64,
        owner: address,
    }
}
This struct holds the information we need related to an item listing. We will attach the actual item to be traded to the Listing object as a dynamic object field, eliminating the need to define any item field or collection.
Note that Listing has the key ability, so we are now able to use its object id as the key when we place it inside of a collection.
Listing and Delisting
Next, we write the logic for listing and delisting items. First, listing an item:
#![allow(unused)]
fn main() {
   /// List an item at the Marketplace.
    public fun list<T: key + store, COIN>(
        marketplace: &mut Marketplace<COIN>,
        item: T,
        ask: u64,
        ctx: &mut TxContext
    ) {
        let item_id = object::id(&item);
        let listing = Listing {
            ask,
            id: object::new(ctx),
            owner: tx_context::sender(ctx),
        };

        ofield::add(&mut listing.id, true, item);
        bag::add(&mut marketplace.items, item_id, listing)
    }
}
As mentioned earlier, we will simply use the dynamic object field interface to attach the item of arbitrary type to be sold, and then we add the Listing object to the Bag of listings, using the object id of the item as the key, and the actual Listing object as the value (which is why Listing also has the store ability).
For delisting, we define the following methods:
#![allow(unused)]
fn main() {
   /// Internal function to remove listing and get an item back. Only owner can do that.
    fun delist<T: key + store, COIN>(
        marketplace: &mut Marketplace<COIN>,
        item_id: ID,
        ctx: &mut TxContext
    ): T {
        let Listing {
            id,
            owner,
            ask: _,
        } = bag::remove(&mut marketplace.items, item_id);

        assert!(tx_context::sender(ctx) == owner, ENotOwner);

        let item = ofield::remove(&mut id, true);
        object::delete(id);
        item
    }

    /// Call [`delist`] and transfer item to the sender.
    public fun delist_and_take<T: key + store, COIN>(
        marketplace: &mut Marketplace<COIN>,
        item_id: ID,
        ctx: &mut TxContext
    ) {
        let item = delist<T, COIN>(marketplace, item_id, ctx);
        transfer::public_transfer(item, tx_context::sender(ctx));
    }
}
Note how the delisted Listing object is unpacked and deleted, and the listed item object is retrieved through ofield::remove. Remember that Sui assets cannot be destroyed outside of their defining module, so we must transfer the item to the delister.
Purchasing and Payments
Buying an item is similar to delisting but with additional logic for handling payments.
#![allow(unused)]
fn main() {
    /// Internal function to purchase an item using a known Listing. Payment is done in Coin<C>.
    /// Amount paid must match the requested amount. If conditions are met,
    /// owner of the item gets the payment and buyer receives their item.
    fun buy<T: key + store, COIN>(
        marketplace: &mut Marketplace<COIN>,
        item_id: ID,
        paid: Coin<COIN>,
    ): T {
        let Listing {
            id,
            ask,
            owner
        } = bag::remove(&mut marketplace.items, item_id);

        assert!(ask == coin::value(&paid), EAmountIncorrect);

        // Check if there's already a Coin hanging and merge `paid` with it.
        // Otherwise attach `paid` to the `Marketplace` under owner's `address`.
        if (table::contains<address, Coin<COIN>>(&marketplace.payments, owner)) {
            coin::join(
                table::borrow_mut<address, Coin<COIN>>(&mut marketplace.payments, owner),
                paid
            )
        } else {
            table::add(&mut marketplace.payments, owner, paid)
        };

        let item = ofield::remove(&mut id, true);
        object::delete(id);
        item
    }

    /// Call [`buy`] and transfer item to the sender.
    public fun buy_and_take<T: key + store, COIN>(
        marketplace: &mut Marketplace<COIN>,
        item_id: ID,
        paid: Coin<COIN>,
        ctx: &mut TxContext
    ) {
        transfer::transfer(
            buy<T, COIN>(marketplace, item_id, paid),
            tx_context::sender(ctx)
        )
    }

}
The first part is the same as delisting an item from listing, but we also check if the payment sent in is the right amount. The second part will insert the payment coin object into our payments Table, and depending on if the seller already has some balance, it will either do a simple table::add or table::borrow_mut and coin::join to merge the payment to existing balance.
The entry function buy_and_take simply calls buy and transfers the purchased item to the buyer.
Taking Profit
Lastly, we define methods for sellers to retrieve their balance from the marketplace.
#![allow(unused)]
fn main() {
   /// Internal function to take profits from selling items on the `Marketplace`.
    fun take_profits<COIN>(
        marketplace: &mut Marketplace<COIN>,
        ctx: &mut TxContext
    ): Coin<COIN> {
        table::remove<address, Coin<COIN>>(&mut marketplace.payments, tx_context::sender(ctx))
    }

    /// Call [`take_profits`] and transfer Coin object to the sender.
    public fun take_profits_and_keep<COIN>(
        marketplace: &mut Marketplace<COIN>,
        ctx: &mut TxContext
    ) {
        transfer::transfer(
            take_profits(marketplace, ctx),
            tx_context::sender(ctx)
        )
    }
}
Quiz: why do we not need to use Capability based access control under this marketplace design? Can we implement the capability design pattern here? What property would that give to the marketplace?
Full Contract
You can find the full smart contract for our implementation of a generic marketplace under the example_projects/marketplace folder.
Deployment and Testing
Next we can deploy and test our marketplace contract through the SUI CLI.
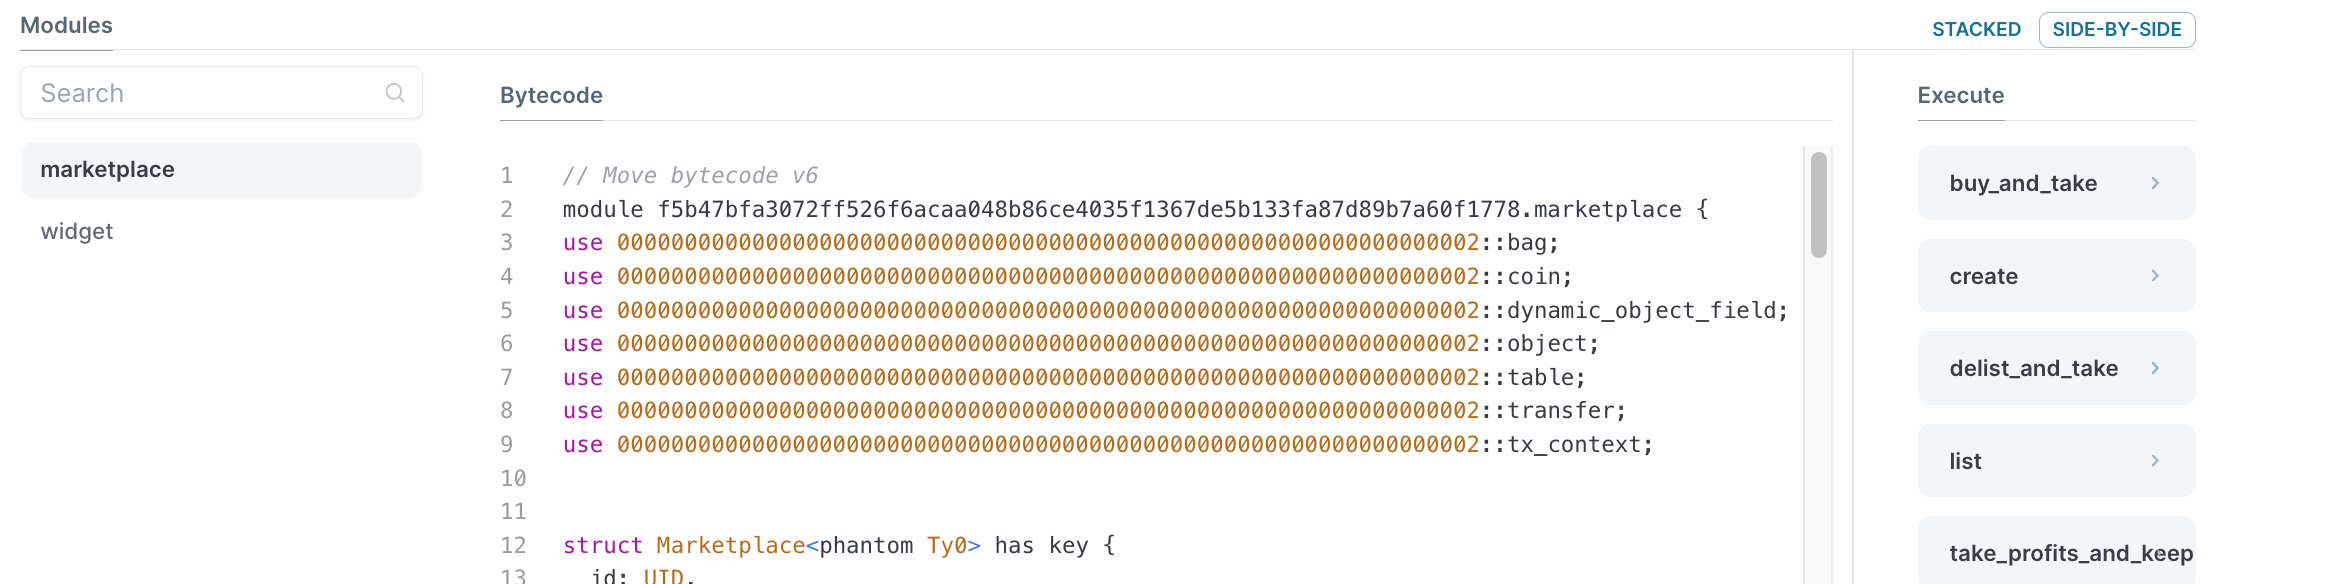
We create a simple marketplace::widget module so we can mint some items for us to list to help with testing.
#![allow(unused)]
fn main() {
module marketplace::widget {

    use sui::object::{Self, UID};
    use sui::transfer;
    use sui::tx_context::{Self, TxContext};

    public struct Widget has key, store {
        id: UID,
    }

    public fun mint(ctx: &mut TxContext) {
        let object = Widget {
            id: object::new(ctx)
        };
        transfer::transfer(object, tx_context::sender(ctx));
    }
}
}
This is basically the Hello World project from Unit One, but made even simpler.
Deployment
Publish the package using:
sui client publish --gas-budget 10000000
You should see both marketplace and widget modules published on the explorer:
Export the package object ID into an environmental variable:
export PACKAGE_ID=<package object ID from previous output>
Initialize the Marketplace
Next, we need to initialize the marketplace contract by calling the create entry function. We want to pass it a type argument to specify which type of fungible token this marketplace will accept. It's easiest to just use the Sui native token here. We can use the following CLI command:
sui client call --function create --module marketplace --package $PACKAGE_ID --type-args 0x2::sui::SUI --gas-budget 10000000
Note the syntax for passing in the type argument for SUI token.
Export the Marketplace shared object's ID into an environmental variable:
export MARKET_ID=<marketplace shared object ID from previous output>
Listing
First, we mint a widget item to be listed:
sui client call --function mint --module widget --package $PACKAGE_ID --gas-budget 10000000
Save the object item of the minted widget to an environmental variable:
export ITEM_ID=<object ID of the widget item from console>
Then we list this item to our marketplace:
sui client call --function list --module marketplace --package $PACKAGE_ID --args $MARKET_ID $ITEM_ID 1 --type-args $PACKAGE_ID::widget::Widget 0x2::sui::SUI --gas-budget 10000000
We need to submit two type arguments here, first is the type of the item to be listed and second is the fungible coin type for the payment. The above example uses a listing price of 1.
After submitting this transaction, you can check the newly created listing on the Sui explorer:
Purchase
Split out a SUI coin object of amount 1 to use as the payment object. You can use the sui client gas CLI command to see a list of available SUI coins under your account and pick one to be split.
sui client split-coin --coin-id <object ID of the coin to be split> --amounts 1 --gas-budget 10000000
Export the object ID of the newly split SUI coin with balance 1:
export PAYMENT_ID=<object ID of the split 1 balance SUI coin>
Now, let's buy back the item that we just listed:
sui client call --function buy_and_take --module marketplace --package $PACKAGE_ID --args $MARKET_ID $ITEM_ID $PAYMENT_ID --type-args $PACKAGE_ID::widget::Widget 0x2::sui::SUI --gas-budget 10000000
You should see a long list of transaction effects in the console after submitting this transaction. We can verify that the widget is owned by our address, and the payments Table now has an entry with the key of our address and should be of size 1.
Take Profits
Finally, we can claim our earnings by calling the take_profits_and_keep method:
sui client call --function take_profits_and_keep --module marketplace --package $PACKAGE_ID --args $MARKET_ID --type-args 0x2::sui::SUI --gas-budget 10000000
This will reap the balance from the payments Table object and return its size to 0. Verify this on the explorer.
Programmable Transaction Block (PTB)
Before we get into Sui Kiosk, it's necessary to learn about Programmable Transaction Block (PTB) and how it helps us to seamlessly fulfill Kiosk usage flow
Introduction
Most of us, more or less, have run into the situation where we want to batch a number of smaller transactions in order into a larger unit and submit one single transaction execution to the blockchain. In traditional blockchain, it was not feasible, and we need workarounds to make this work, the common solutions are:
- Submit the transactions subsequently one by one. This way works fine but the performance of your dApps is demoted significantly as you need to wait one transaction to be finalized before you can use their outputs for the next transaction in line. Moreover, the gas fee will not be a pleasant for the end-users
- Create a new smart contract and a wrapper function to execute other functions from the same or different smart contracts. This approach may speed up your application and consume less gas fee but in return, reduce the developer experience as every new business use case might need a new wrapper function.
That’s why we introduce Programmable Transaction Block (PTB).
Features
PTB is a built-in feature and supported natively by Sui Network and Sui VM. On Sui, a transaction (block) by default is a Programmable Transaction Block (PTB). PTB is a powerful tool enhancing developers with scalalability and composability:
- Each PTB is composed of multiple individual commands chaining together in order. One command that we will use most of the time is
MoveCall. For other commands, please refer to the documentation here. - When the transaction is executed, the commands are executed in the order they are defined when building the PTB. The outputs of one transaction command can be used as inputs for any subsequent commands.
- Sui guarantees the atomicity of a PTB by applying the effects of all commands in the transaction (block) at the end of the transaction. If one command fails, the entire block fails and effects will not take place.
- Each PTB can hold up to 1024 unique operations. This allows cheaper gas fee and faster execution compared to executing 1024 individual transactions in other traditional blockchains.
- If the output returned by one command is non-
dropvalue. It must be consumed by subsequent commands within the same PTB. Otherwise, the transaction (block) is considered to be failed.
💡Note: Refer to documentation here for full details on PTB
Usage
There are several ways we can use to build and execute a PTB:
- We already learned how to use the CLI
sui client callto execute a single smart contract function. Behind the scenes, it is implemented using PTB with singleMoveCallcommand. To build a PTB with full functionality, please use the CLIsui client ptband refer to its usage here. - Use the Sui SDK: Sui Typescript SDK, Sui Rust SDK.
Hot Potato Pattern
A hot potato is a struct that has no capabilities, therefore you can only pack and unpack it in its module. The Hot Potato Pattern leverages the PTB mechanics and is commonly used in cases when the application wants to enforce users to fulfill determined business logic before the transaction ends. In simpler terms, if a hot potato value is returned by the transaction command A, you must consume it in any subsequent command B within the same PTB. The most popular use case of Hot Potato Pattern is flashloan.
Type Definitions
module flashloan::flashloan {
    // === Imports ===
    use sui::sui::SUI;
    use sui::coin::{Self, Coin};
    use sui::balance::{Self, Balance};
    use sui::object::{UID};
    use sui::tx_context::{TxContext};

    /// For when the loan amount exceed the pool amount
    const ELoanAmountExceedPool: u64 = 0;
    /// For when the repay amount do not match the initial loan amount
    const ERepayAmountInvalid: u64 = 1;

    /// A "shared" loan pool.
    /// For demonstration purpose, we assume the loan pool only allows SUI.
    public struct LoanPool has key {
        id: UID,
        amount: Balance<SUI>,
    }

    /// A loan position.
    /// This is a hot potato struct, it enforces the users
    /// to repay the loan in the end of the transaction or within the same PTB.
    public struct Loan {
        amount: u64,
    }
}
We have a LoanPool shared object acting as a money vault ready for users to borrow. For simplicity sake, this pool only accepts SUI. Next, we have Loan which is a hot potato struct, we will use it to enforce users to repay the loan before transaction ends. Loan only has 1 field amount which is the borrowed amount.
Borrow
/// Function allows users to borrow from the loan pool.
/// It returns the borrowed [`Coin<SUI>`] and the [`Loan`] position
/// enforcing users to fulfill before the PTB ends.
public fun borrow(pool: &mut LoanPool, amount: u64, ctx: &mut TxContext): (Coin<SUI>, Loan) {
    assert!(amount <= balance::value(&pool.amount), ELoanAmountExceedPool);

    (
        coin::from_balance(balance::split(&mut pool.amount, amount), ctx),
        Loan {
            amount
        }
    )
}
Users can borrow the money from the LoanPool by calling borrow(). Basically, it will return the Coin<SUI> the users can use as they like for subsequent function calls. A Loan hot potato value is also returned. As mentioned previously, the only way to consume the Loan is through unpacking it in the functions from the same module. This allows only the application itself has the right to decide how to consume the hot potato, not external parties.
Repay
/// Repay the loan
/// Users must execute this function to ensure the loan is repaid before the transaction ends.
public fun repay(pool: &mut LoanPool, loan: Loan, payment: Coin<SUI>) {
    let Loan { amount } = loan;
    assert!(coin::value(&payment) == amount, ERepayAmountInvalid);

    balance::join(&mut pool.amount, coin::into_balance(payment));
}
Users at some point must repay() the loan before the PTB ends. We consume the Loan by unpacking it, otherwise, you will receive compiler error if you use its fields with direct access loan.amount as Loan is non-drop. After unpacking, we simply use the loan amount to perform valid payment check and update the LoanPool accordingly.
Example
Let's try to create an example with flashloan where we borrow some SUI amount, use it to mint a dummy NFT and sell it to repay the debt. We will learn how to use PTB with Sui CLI to execute this all in one transaction.
/// A dummy NFT to represent the flashloan functionality
public struct NFT has key{
    id: UID,
    price: Balance<SUI>,
}

/// Mint NFT
    public fun mint_nft(payment: Coin<SUI>, ctx: &mut TxContext): NFT {
        NFT {
            id: object::new(ctx),
            price: coin::into_balance(payment),
        }
    }

/// Sell NFT
public fun sell_nft(nft: NFT, ctx: &mut TxContext): Coin<SUI> {
    let NFT {id, price} = nft;
    object::delete(id);
    coin::from_balance(price, ctx)
}
You should able to publish the smart contract using the previous guide. After the smart deployment, we should have the package ID and the shared LoanPool object. Let's export them so we can use it later.
export LOAN_PACKAGE_ID=<package id>
export LOAN_POOL_ID=<object id of the loan pool>
You need to deposit some SUI amount using flashloan::deposit_pool function. For demonstration purpose, we will deposit 10_000 MIST in the loan pool.
sui client ptb \
--split-coins gas "[10000]" \
--assign coin \
--move-call $LOAN_PACKAGE_ID::flashloan::deposit_pool @$LOAN_POOL_ID coin.0 \
--gas-budget 10000000
Now let's build a PTB that borrow() -> mint_nft() -> sell_nft() -> repay().
sui client ptb \
--move-call $LOAN_PACKAGE_ID::flashloan::borrow @$LOAN_POOL_ID 10000 \
--assign borrow_res \
--move-call $LOAN_PACKAGE_ID::flashloan::mint_nft borrow_res.0 \
--assign nft \
--move-call $LOAN_PACKAGE_ID::flashloan::sell_nft nft \
--assign repay_coin \
--move-call $LOAN_PACKAGE_ID::flashloan::repay @$LOAN_POOL_ID borrow_res.1 repay_coin \
--gas-budget 10000000
Quiz: What happen if you don't call repay() at the end of the PTB, please try it yourself
💡Note: You may want to check out SuiVision or SuiScan to inspect the PTB for more details
Sui Kiosk
Now we have learned the basics of Programmable Transaction Block and Hot Potato Design Pattern, it is much easier for us to understand the mechanism behind Sui Kiosk. Let's get started
What is Sui Kiosk?
We're probably familiar to some sort of kiosks in real life. It can be a stall in a tourist shopping mall selling you merchantdise, apparels or any local souvenirs. It can be in a form of big screen displaying you digital images of the products you're interested in. They may all come with different forms and sizes but they have one common trait: they sell something and display their wares openly for passersby to browse and engage with
Sui Kiosk is the digital version of these types of kiosk but for digital assets and collectibles. Sui Kiosk is a decentralized system for onchain commerce applications on Sui. Practically, Kiosk is a part of the Sui framework, and it is native to the system and available to everyone out of the box.
Why Sui Kiosk?
Sui Kiosk is created to answer these needs:
- Can we list an item on marketplace and continue using it?
- Is there a way to create a “safe” for collectibles?
- Can we build an onchain system with custom logic for transfer management?
- How to favor creators and guarantee royalties?
- Can we avoid centralization of traditional marketplaces?
Main Components
Sui Kiosk consists these 2 main components:
Kiosk+KioskOwnerCap:Kioskis the safe that will store our assets and display them for selling, it is implemented as a shared object allowing interactions between multiple parties. EachKioskwill have a corresponding Kiosk Owner whoever holding theKioskOwnerCap. The Kiosk Owner still have the logical ownership over their assets even when they are physically placed in the kiosk.TransferPolicy+TransferPolicyCap:TransferPolicyis a shared object defines the conditions in which the assets can be traded or sold. EachTransferPolicyconsists a set of rules, with each rule specifies the requirements every trade must sastify. Rules can be enabled or disabled from theTransferPolicyby whoever owning theTransferOwnerCap. Greate example ofTransferPolicy's rule is the royalty fees guarantee.
Sui Kiosk Users
Sui Kiosk use-cases is centered around these 3 types of users:
- Kiosk Owner (Seller/KO): One must own the
KioskOwnerCapto become the Kiosk Owner. KO can:- Place their assets in kiosk.
- Withdraw the assets in kiosk if they're not locked.
- List assets for sale.
- Withdraw profits from sales.
- Borrow and mutate owned assets in kiosk.
- Buyer: Buyer can be anyone who's willing to purchase the listed items. The buyers must satisfy the
TransferPolicyfor the trade to be considered successful. - Creator: Creator is a party that creates and controls the
TransferPolicyfor a single type. For example, authors of SuiFrens collectibles are the creators ofSuiFren<Capy>type and act as creators in the Sui Kiosk system. Creators can:- Set any rules for trades.
- Set multiple tracks of rules.
- Enable or disable trades at any moment with a policy.
- Enforce policies (eg royalties) on all trades.
- All operations are affected immediately and globally.
Asset States in Sui Kiosk
When you add an asset to your kiosk, it has one of the following states:
PLACED- an item is placed inside the kiosk. The Kiosk Owner can withdraw it and use it directly, borrow it (mutably or immutably), or list an item for sale.LOCKED- an item is placed and locked in the kiosk. The Kiosk Owner can't withdraw a locked item from kiosk, but you can borrow it mutably and list it for sale.LISTED- an item in the kiosk that is listed for sale. The Kiosk Owner can’t modify an item while listed, but you can borrow it immutably or delist it, which returns it to its previous state.
💡Note: there is another state called LISTED EXCLUSIVELY, which is not covered in this unit and will be covered in the future in advanced section
Kiosk Basic Usage
Create Kiosk
Let's first deploy the example kiosk smart contract and export the package ID for later use.
export KIOSK_PACKAGE_ID=<Package ID of example kiosk smart contract>
module kiosk::kiosk {
    use sui::kiosk::{Self, Kiosk, KioskOwnerCap};
    use sui::tx_context::{TxContext};

    #[allow(lint(share_owned, self_transfer))]
    /// Create new kiosk
    public fun new_kiosk(ctx: &mut TxContext) {
        let (kiosk, kiosk_owner_cap) = kiosk::new(ctx);
        transfer::public_share_object(kiosk);
        transfer::public_transfer(kiosk_owner_cap, sender(ctx));
    }
}
There are 2 ways to create a new kiosk:
- Use
kiosk::new()to create new kiosk but we have to make theKioskshared object and transfer theKioskOwnerCapto the sender ourselves by usingsui::transfer.
sui client call --package $KIOSK_PACKAGE_ID --module kiosk --function new_kiosk --gas-budget 10000000
- Use
entry kiosk::default()to automatically do all above steps for us.
You can export the newly created Kiosk and its KioskOwnerCap for later use.
export KIOSK=<Object id of newly created Kiosk>
export KIOSK_OWNER_CAP=<Object id of newly created KioskOwnerCap>
💡Note: Kiosk is heterogeneous collection by default so that's why it doesn't need type parameter for their items
Place Item inside Kiosk
public struct TShirt has key, store {
    id: UID,
}

public fun new_tshirt(ctx: &mut TxContext): TShirt {
    TShirt {
        id: object::new(ctx),
    }
}

/// Place item inside kiosk
public fun place(kiosk: &mut Kiosk, cap: &KioskOwnerCap, item: TShirt) {
    kiosk::place(kiosk, cap, item)
}
We can use kiosk::place() API to place an item inside kiosk. Remember that only the Kiosk Owner can have access to this API.
Withdraw Item from Kiosk
/// Withdraw item from Kiosk
public fun withdraw(kiosk: &mut Kiosk, cap: &KioskOwnerCap, item_id: object::ID): TShirt {
    kiosk::take(kiosk, cap, item_id)
}
We can use kiosk::take() API to withdraw an item from kiosk. Remember that only the Kiosk Owner can have access to this API.
List Item for Sale
/// List item for sale
public fun list(kiosk: &mut Kiosk, cap: &KioskOwnerCap, item_id: object::ID, price: u64) {
    kiosk::list<TShirt>(kiosk, cap, item_id, price)
}
We can use kiosk::list() API to list an item for sale. Remember that only the Kiosk Owner can have access to this API.
Transfer Policy and Buy from Kiosk
In this section, we will learn how to create a TransferPolicy and use it to enforce rules the buyers must comply before the purchased item is owned by them.
TransferPolicy
Create a TransferPolicy
TransferPolicy for type T must be created for that type T to be tradeable in the Kiosk system. TransferPolicy is a shared object acting as a central authority enforcing everyone to check their purchase is valid against the defined policy before the purchased item is transferred to the buyers.
use sui::tx_context::{TxContext, sender};
use sui::transfer_policy::{Self, TransferRequest, TransferPolicy, TransferPolicyCap};
use sui::package::{Self, Publisher};
use sui::transfer::{Self};

public struct KIOSK has drop {}

fun init(witness: KIOSK, ctx: &mut TxContext) {
    let publisher = package::claim(otw, ctx);
    transfer::public_transfer(publisher, sender(ctx));
}

#[allow(lint(share_owned, self_transfer))]
/// Create new policy for type `T`
public fun new_policy(publisher: &Publisher, ctx: &mut TxContext) {
    let (policy, policy_cap) = transfer_policy::new<TShirt>(publisher, ctx);
    transfer::public_share_object(policy);
    transfer::public_transfer(policy_cap, sender(ctx));
}
Create a TransferPolicy<T> requires the proof of publisher Publisher of the module comprising T. This ensures only the creator of type T can create TransferPolicy<T>. There are 2 ways to create the policy:
- Use
transfer_policy::new()to create new policy, make theTransferPolicyshared object and transfer theTransferPolicyCapto the sender by usingsui::transfer.
sui client call --package $KIOSK_PACKAGE_ID --module kiosk --function new_policy --args $KIOSK_PUBLISHER --gas-budget 10000000
- Use
entry transfer_policy::default()to automatically do all above steps for us.
You should already receive the Publisher object when publish the package. Let's export it for later use.
export KIOSK_PUBLISHER=<Publisher object ID>
You should see the newly created TransferPolicy object and TransferPolicyCap object in the terminal. Let's export it for later use.
export KIOSK_TRANSFER_POLICY=<TransferPolicy object ID>
export KIOSK_TRANSFER_POLICY_CAP=<TransferPolicyCap object ID>
Implement Fixed Fee Rule
TransferPolicy doesn't enforce anything without any rule, let's learn how to implement a simple rule in a separated module to enforce users to pay a fixed royalty fee for a trade to succeed.
💡Note: There is a standard approach to implement the rules. Please checkout the rule template here
Rule Witness & Rule Config
module kiosk::fixed_royalty_rule {
    /// The `amount_bp` passed is more than 100%.
    const EIncorrectArgument: u64 = 0;
    /// The `Coin` used for payment is not enough to cover the fee.
    const EInsufficientAmount: u64 = 1;

    /// Max value for the `amount_bp`.
    const MAX_BPS: u16 = 10_000;

    /// The Rule Witness to authorize the policy
    public struct Rule has drop {}

    /// Configuration for the Rule
    public struct Config has store, drop {
        /// Percentage of the transfer amount to be paid as royalty fee
        amount_bp: u16,
        /// This is used as royalty fee if the calculated fee is smaller than `min_amount`
        min_amount: u64,
    }
}
Rule represents a witness type to add to TransferPolicy, it helps to identify and distinguish between multiple rules adding to one policy. Config is the configuration of the Rule, as we implement fixed royaltee fee, the settings should include the percentage we want to deduct out of original payment.
Add Rule to TransferPolicy
/// Function that adds a Rule to the `TransferPolicy`.
/// Requires `TransferPolicyCap` to make sure the rules are
/// added only by the publisher of T.
public fun add<T>(
    policy: &mut TransferPolicy<T>,
    cap: &TransferPolicyCap<T>,
    amount_bp: u16,
    min_amount: u64

) {
    assert!(amount_bp <= MAX_BPS, EIncorrectArgument);
    transfer_policy::add_rule(Rule {}, policy, cap, Config { amount_bp, min_amount })
}
We use transfer_policy::add_rule() to add the rule with its configuration to the policy.
Let's execute this function from the client to add the Rule to the TransferPolicy, otherwise, it is disabled. In this example, we configure the percentage of royalty fee is 0.1% ~ 10 basis points and the minimum amount royalty fee is 100 MIST.
sui client call --package $KIOSK_PACKAGE_ID --module fixed_royalty_rule --function add --args $KIOSK_TRANSFER_POLICY $KIOSK_TRANSFER_POLICY_CAP 10 100 --type-args $KIOSK_PACKAGE_ID::kiosk::TShirt --gas-budget 10000000
Satisfy the Rule
/// Buyer action: Pay the royalty fee for the transfer.
public fun pay<T: key + store>(
    policy: &mut TransferPolicy<T>,
    request: &mut TransferRequest<T>,
    payment: Coin<SUI>
) {
    let paid = transfer_policy::paid(request);
    let amount = fee_amount(policy, paid);

    assert!(coin::value(&payment) == amount, EInsufficientAmount);

    transfer_policy::add_to_balance(Rule {}, policy, payment);
    transfer_policy::add_receipt(Rule {}, request)
}

/// Helper function to calculate the amount to be paid for the transfer.
/// Can be used dry-runned to estimate the fee amount based on the Kiosk listing price.
public fun fee_amount<T: key + store>(policy: &TransferPolicy<T>, paid: u64): u64 {
    let config: &Config = transfer_policy::get_rule(Rule {}, policy);
    let amount = (((paid as u128) * (config.amount_bp as u128) / 10_000) as u64);

    // If the amount is less than the minimum, use the minimum
    if (amount < config.min_amount) {
        amount = config.min_amount
    };

    amount
}
We need a helper fee_amount() to calculate the royalty fee given the policy and the payment amount. We use transfer_policy::get_rule() to enquire the configuration and use it for fee calculation.
pay() is a function that users must call themselves to fulfill the TransferRequest (described in the next section) before transfer_policy::confirm_request(). transfer_policy::paid() gives us original payment of the trade represented by TransferRequest. After royalty fee calculation, we will add the fee to the policy through transfer_policy::add_to_balance(), any fee collected by the policy is accumulated here and TransferPolicyCap owner can withdraw later. Last but not least, we use transfer_policy::add_receipt() to flag the TransferRequest that this rule is passed and ready to be confirmed with transfer_policy::confirm_request().
Buy Item from Kiosk
use sui::transfer_policy::{Self, TransferRequest, TransferPolicy};

/// Buy listed item
public fun buy(kiosk: &mut Kiosk, item_id: object::ID, payment: Coin<SUI>): (TShirt, TransferRequest<TShirt>){
    kiosk::purchase(kiosk, item_id, payment)
}

/// Confirm the TransferRequest
public fun confirm_request(policy: &TransferPolicy<TShirt>, req: TransferRequest<TShirt>) {
    transfer_policy::confirm_request(policy, req);
}
When buyers buy the asset by using kiosk::purchase() API, an item is returned alongside with a TransferRequest. TransferRequest is a hot potato forcing us to consume it through transfer_policy::confirm_request(). transfer_policy::confirm_request()'s job is to verify whether all the rules configured and enabled in the TransferPolicy are complied by the users. If one of the enabled rules are not satisfied, then transfer_policy::confirm_request() throws error leading to the failure of the transaction. As a consequence, the item is not under your ownership even if you tried to transfer the item to your account before transfer_policy::confirm_request().
💡Note: The users must compose a PTB with all necessary calls to ensure the TransferRequest is valid before confirm_request() call.
The flow can be illustrated as follow:
Buyer -> kiosk::purchase() -> Item + TransferRequest -> Subsequent calls to fulfill TransferRequest -> transfer_policy::confirm_request() -> Transfer Item under ownership
Kiosk Full Flow Example
Recall from the previous section, the item must be placed inside the kiosk, then it must be listed to become sellable. Assuming the item is already listed with price 10_000 MIST, let's export the listed item as terminal variable.
export KIOSK_TSHIRT=<Object ID of the listed TShirt>
Let's build a PTB to execute a trade. The flow is straightforward, we buy the listed item from the kiosk, the item and TransferRequest is returned, then, we call fixed_royalty_fee::pay to fulfill the TransferRequest, we confirm the TransferRequest with confirm_request() before finally transfer the item to the buyer.
sui client ptb \
--assign price 10000 \
--split-coins gas "[price]" \
--assign coin \
--move-call $KIOSK_PACKAGE_ID::kiosk::buy @$KIOSK @$KIOSK_TSHIRT coin.0 \
--assign buy_res \
--move-call $KIOSK_PACKAGE_ID::fixed_royalty_rule::fee_amount "<$KIOSK_PACKAGE_ID::kiosk::TShirt>" @$KIOSK_TRANSFER_POLICY price \
--assign fee_amount \
--split-coins gas "[fee_amount]"\
--assign coin \
--move-call $KIOSK_PACKAGE_ID::fixed_royalty_rule::pay "<$KIOSK_PACKAGE_ID::kiosk::TShirt>" @$KIOSK_TRANSFER_POLICY buy_res.1 coin.0 \
--move-call $KIOSK_PACKAGE_ID::kiosk::confirm_request  @$KIOSK_TRANSFER_POLICY buy_res.1 \
--move-call 0x2::transfer::public_transfer "<$KIOSK_PACKAGE_ID::kiosk::TShirt>" buy_res.0 <buyer address> \
--gas-budget 10000000
BCS Encoding
Binary Canonical Serialization, or BCS, is a serialization format developed in the context of the Diem blockchain, and is now extensively used in most of the blockchains based on Move (Sui, Starcoin, Aptos, 0L). BCS is not only used in the Move VM, but also used in transaction and event coding, such as serializing transactions before signing, or parsing event data.
Knowing how BCS works is crucial if you want to understand how Move works at a deeper level and become a Move expert. Let's dive in.
BCS Specification and Properties
There are some high-level properties of BCS encoding that are good to keep in mind as we go through the rest of the lesson:
-
BCS is a data-serialization format where the resulting output bytes do not contain any type information; because of this, the side receiving the encoded bytes will need to know how to deserialize the data
-
There are no structs in BCS (since there are no types); the struct simply defines the order in which fields are serialized
-
Wrapper types are ignored, so
OuterTypeandUnnestedTypewill have the same BCS representation:#![allow(unused)] fn main() { struct OuterType { owner: InnerType } struct InnerType { address: address } struct UnnestedType { address: address } } -
Types containing the generic type fields can be parsed up to the first generic type field. So it's a good practice to put the generic type field(s) last if it's a custom type that will be ser/de'd.
#![allow(unused)]
fn main() {
struct BCSObject<T> has drop, copy {
    id: ID,
    owner: address,
    meta: Metadata,
    generic: T
}
}
In this example, we can deserialize everything up to the
metafield. -
Primitive types like unsigned ints are encoded in Little Endian format
-
Vector is serialized as a ULEB128 length (with max length up to
u32) followed by the content of the vector.
The full BCS specification can be found in the BCS repository.
Using the @mysten/bcs JavaScript Library
Installation
The library you will need to install for this part is the @mysten/bcs library. You can install it by typing in the root directory of a node project:
npm i @mysten/bcs
Basic Example
Let's use the JavaScript library to serialize and de-serialize some simple data types first:
import { BCS, getSuiMoveConfig } from "@mysten/bcs";

// initialize the serializer with default Sui Move configurations
const bcs = new BCS(getSuiMoveConfig());

// Define some test data types
const integer = 10;
const array = [1, 2, 3, 4];
const string = "test string"

// use bcs.ser() to serialize data
const ser_integer = bcs.ser(BCS.U16, integer);
const ser_array = bcs.ser("vector<u8>", array);
const ser_string = bcs.ser(BCS.STRING, string);

// use bcs.de() to deserialize data
const de_integer = bcs.de(BCS.U16, ser_integer.toBytes());
const de_array = bcs.de("vector<u8>", ser_array.toBytes());
const de_string = bcs.de(BCS.STRING, ser_string.toBytes());
We can initialize the serializer instance with the built-in default setting for Sui Move using the above syntax, new BCS(getSuiMoveConfig()).
There are built-in ENUMs that can be used for Sui Move types like BCS.U16, BCS.STRING, etc. For generic types, it can be defined using the same syntax as in Sui Move, like vector<u8> in the above example.
Let's take a close look at the serialized and deserialized fields:
# ints are little-endian hexadecimals
0a00
10
# the first element of a vector indicates the total length,
# then it's just whatever elements are in the vector
0401020304
1,2,3,4
# strings are just vectors of u8's, with the first element equal to the length of the string
0b7465737420737472696e67
test string
Type Registration
We can register the custom types we will be working with using the following syntax:
import { BCS, getSuiMoveConfig } from "@mysten/bcs";
const bcs = new BCS(getSuiMoveConfig());

// Register the Metadata Type
bcs.registerStructType("Metadata", {
  name: BCS.STRING,
});

// Same for the main object that we intend to read
bcs.registerStructType("BCSObject", {
  // BCS.ADDRESS is used for ID types as well as address types
  id: BCS.ADDRESS,
  owner: BCS.ADDRESS,
  meta: "Metadata",
});
Using bcs in Sui Smart Contracts
Let's continue our example from above with the structs.
Struct Definition
We start with the corresponding struct definitions in the Sui Move contract.
#![allow(unused)]
fn main() {
{
    //..
    struct Metadata has drop, copy {
        name: std::ascii::String
    }

    struct BCSObject has drop, copy {
        id: ID,
        owner: address,
        meta: Metadata
    }
    //..
}
}
Deserialization
Now, let's write the function to deserialize an object in a Sui contract.
#![allow(unused)]
fn main() {
    public fun object_from_bytes(bcs_bytes: vector<u8>): BCSObject {

        // Initializes the bcs bytes instance
        let bcs = bcs::new(bcs_bytes);

        // Use `peel_*` functions to peel values from the serialized bytes.
        // Order has to be the same as we used in serialization!
        let (id, owner, meta) = (
        bcs::peel_address(&mut bcs), bcs::peel_address(&mut bcs), bcs::peel_vec_u8(&mut bcs)
        );
        // Pack a BCSObject struct with the results of serialization
        BCSObject { id: object::id_from_address(id), owner, meta: Metadata {name: std::ascii::string(meta)}  } }

}
The varies peel_* methods in Sui Frame bcs module are used to "peel" each individual field from the BCS serialized bytes. Note that the order we peel the fields must be exactly the same as the order of the fields in the struct definition.
Quiz: Why are the results not the same from the first two peel_address calls on the same bcs object?
Also note how we convert the types from address to id, and from vector<8> to std::ascii::string with helper functions.
Quiz: What would happen if BSCObject had a UID type instead of an ID type?
Complete Ser/De Example
Find the full JavaScript and Sui Move sample codes in the example_projects folder.
First, we serialize a test object using the JavaScript program:
// We construct a test object to serialize, note that we can specify the format of the output to hex
let _bytes = bcs
  .ser("BCSObject", {
    id: "0x0000000000000000000000000000000000000005",
    owner: "0x000000000000000000000000000000000000000a",
    meta: {name: "aaa"}
  })
  .toString("hex");
We want the BCS writer's output to be in hexadecimal format this time, which can be specified like above.
Affix the serialization result hexstring with 0x prefix and export to an environmental variable:
export OBJECT_HEXSTRING=0x0000000000000000000000000000000000000005000000000000000000000000000000000000000a03616161
Now we can either run the associated Move unit tests to check for correctness:
sui move test
You should see this in the console:
BUILDING bcs_move
Running Move unit tests
[ PASS    ] 0x0::bcs_object::test_deserialization
Test result: OK. Total tests: 1; passed: 1; failed: 0
Or we can publish the module (and export the PACKAGE_ID) and call the emit_object method using the above BCS serialized hexstring:
sui client call --function emit_object --module bcs_object --package $PACKAGE_ID --args $OBJECT_HEXSTRING --gas-budget 1000
We can then check the Events tab of the transaction on the Sui Explorer to see that we emitted the correctly deserialized BCSObject:
